
We may receive a commission on purchases made from links.
A hard-to-open jar can be frustrating in the kitchen, especially when you’re hungry. It can feel impossible to get a jar open when it’s just not budging despite your best efforts, and it’s not a good idea to strain yourself too hard and risk injury. Our strength levels can vary depending on our physical condition, and they can also fluctuate over time. Conditions like arthritis can make the job even more daunting. In addition, some jars are simply sealed incredibly tightly because of the vacuum pressure that builds up when they are hermetically sealed. They can be hard to open even for the fittest among us.
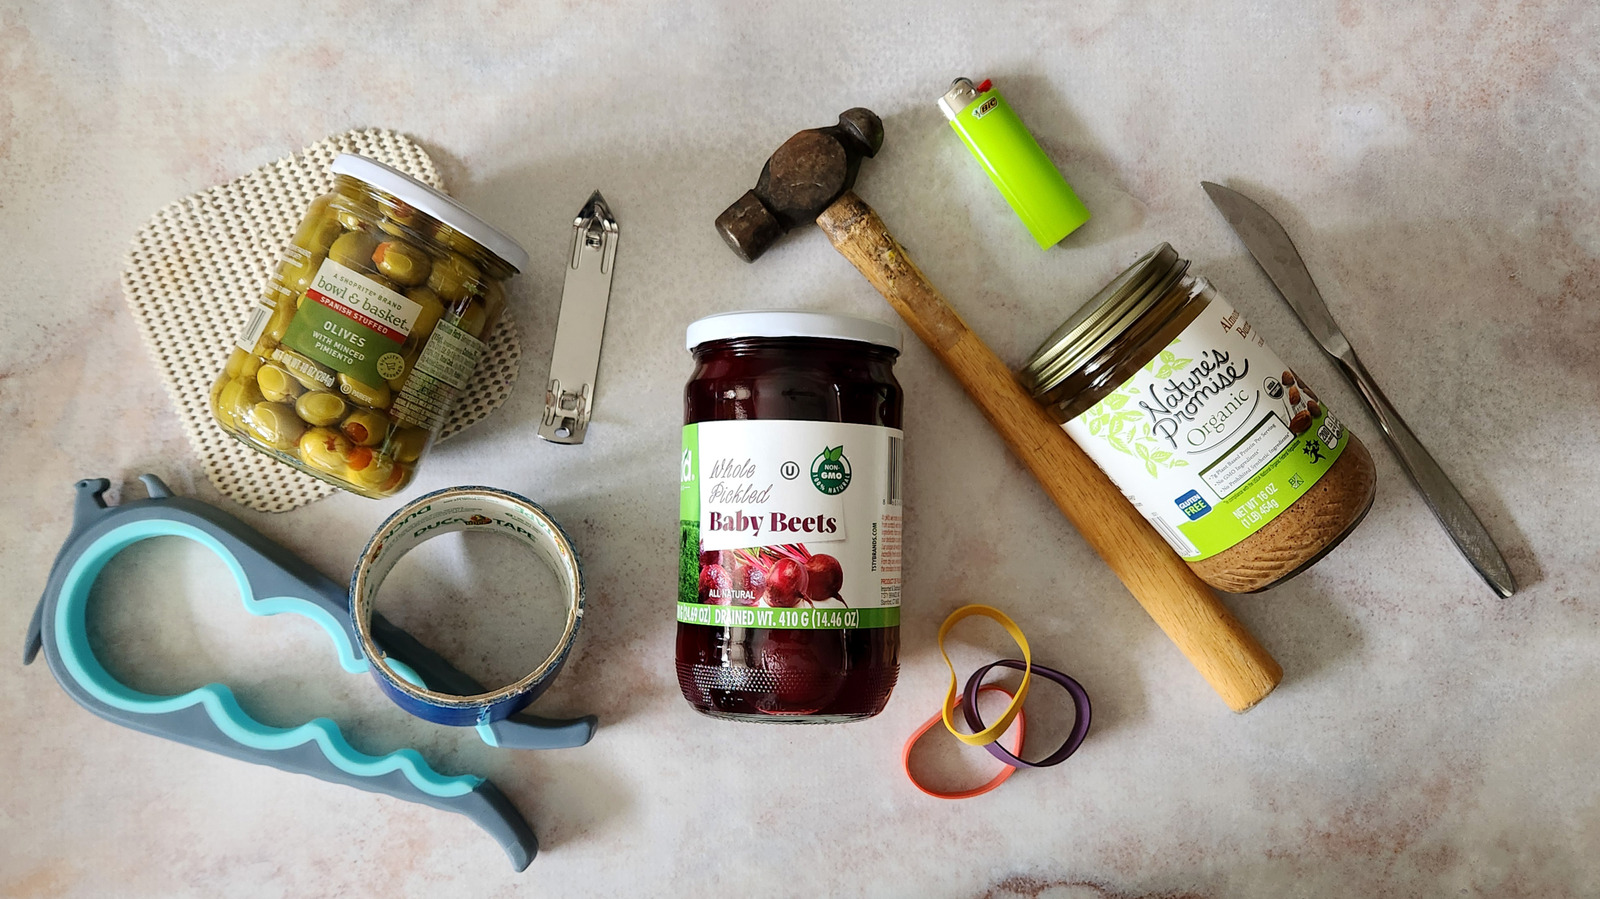
If you can’t outsource the job to someone in your household with greater grip strength, hope is not lost. There are quite a few hacks that can help you get the job done. While the methods vary, they all focus on breaking the seal of the jar so you can twist it off with ease. While there are some dedicated tools you can purchase, many of these methods don’t involve spending money, or they employ objects people are likely to have in their homes already. So, don’t despair over that can of pickles staring at you from the kitchen counter tightly sealed. Take a look around your kitchen, garage, and even the bathroom for some common household items that can help you get the job done. If one method doesn’t work, try another until you hear the satisfying pop that signifies a job well done.
1. Hot water
We learned in science class that metals expand when heated, although not as much as liquids or gasses, because the atoms in solids have stronger bonds. When heated, the atoms vibrate more, which requires more space, so the material expands. Remember this when a stubborn jar won’t open. Running the lid under hot water causes the metal lid to expand slightly, and that might be enough to loosen the seal and allow you to twist the lid open.
Invert the jar and place it under the kitchen tap with the water as hot as it will go. Take care to keep your hands on the other end of jar away from the water, or protect them with gloves or a waterproof pot holder. Wet the lid for a couple minutes, dry it quickly, and then try to twist it open, holding the lid with a towel or a gripper to protect your hands. Repeat if it didn’t open the first time. Alternatively, you can fill a dish or bowl with enough hot water to cover the lid with the jar placed upside down in the water rather than holding the jar under the tap.
Don’t run the risk of shattering glass jars — if the jar is cold, let it come up to room temperature before using the hot water trick in order to prevent thermal shock. Hot water will also help open jars that have already been opened but got stuck later from trapped sticky residue like jam or honey.
2. Butter knife
The reason the hot water trick works is because it loosens the overly tight seal on a stuck jar, but it’s not the only way you can break the seal without any special equipment. Assorted knives are among the essential kitchen tools most people are likely to have in their kitchen already, but all you need is a humble butter knife for this one.
To loosen a jar lid with a knife, first turn the jar upside down. Insert the tip of the knife between the lid and the side of the jar, and press down. You need to wedge the knife down into that space at least a little to try to get air to enter and loosen the seal. Carefully remove the knife (it will probably pop out with a little force depending on how far you wedged it in), rotate the jar, and repeat the operation on a couple of other spots around the lid’s circumference. Turn the jar right-side up and try to open it. Hopefully, the seal will have broken and the jar will open, but if not, try inserting the knife in a couple more places around the lid and try opening it again.
You can use a sharper knife if you want, but be very careful. Be careful with a butter knife, too, as it may come out with force. We don’t recommend using your best knives because the tip might get a little bent when you insert it around the lid.
3. Rubber gripper
A rubber gripper is a thin piece of rubbery material with small holes that’s shaped like a small square or circle. These low-tech tools have been around for a long time, and they work really well. More modern grippers are made of silicone and have a bumpy texture rather than small holes. Either way, these simple items work by providing traction between your hand and the lid of the jar. This eliminates any slipping and exerts greater force on the lid, making it easier to open.
It can be a good idea to use two grippers — one on top of the lid and one as a base set under the jar. The last thing you want when putting all your force into opening a jar is to press too hard and have it slide off the countertop and onto the floor, so a second gripper holding it in place on the counter can be a good idea. A dish towel set under the jar can serve the same purpose, and it gives you the added benefit of catching any spilled liquid that might splash out if the lid comes off with force. A second gripper also comes in handy to keep the hand that’s gripping the jar in place.
If you don’t have a gripper, try a damp cotton or linen tea towel, but make sure it’s only slightly damp. It’s extremely hard to open a jar if your hands are slippery or wet, but in terms of towels, dampening it makes it less slippery.
4. Duct tape
Strong, durable, and easy to find, duct tape is a versatile adhesive that can be employed for uses as diverse as removing pet hair, repairing boats, and making a temporary splint for a broken bone. You can even use it to make a dress or suit or make homemade ice cream in a coffee can. While it’s normally used for attaching things, there is one way you can use duct tape to loosen something instead of making it tighter. With a little attention to the application, you can apply duct tape to a jar lid to fashion a DIY jar opener.
Line up the lower edge of the tape (longways) with the bottom of the jar lid, stick it on, and start wrapping it around the lid. Make sure to apply it counter-clockwise so it will loosen the jar when you use it rather than tightening it. Stop about one quarter of the way around. Now, only in the area where the tape is attached, press the upper part of the tape down so it sticks to the lid. Unroll more tape to form a tail, cut it off when it’s about 12 inches long, and fold it in half longways to hide the sticky part and make the tail stronger. The next step is the fun part. Pull the tail with one hand while holding the jar in the other. A firm and decisive yank should loosen the lid enough to open it normally.
5. The water hammer
The water hammer refers to a method of forcing the contents of a jar forward in one strong movement in order to exert pressure on the lid of the jar and break the seal. Despite the name, you’ll need neither water nor a hammer. The heel of your hand will provide the power. Hold the jar in your non-dominant hand, pointing the jar downward at a 45-degree angle. Raise your dominant hand and give the bottom of the jar a strong slap with the heel of that hand. If the seal doesn’t break, try again.
Some people may not want to use their hand for this, depending on their strength and tolerance for striking their palm on a hard surface. If that’s the case, hold the jar in the same way but use a large wooden spoon or other similar kitchen utensil to strike the jar. Don’t bludgeon it with something too heavy or the jar could break. Be sure to keep a firm grasp on the jar with your non-dominant hand. You don’t want the jar to go flying and shatter. To be safe, wrap the rest of the jar in a kitchen towel before you strike the bottom.
An alternative to the water hammer is to strike the seal with a wooden spoon. Tap firmly around the lid where it meets the jar until you can twist the lid off. You could also strike that junction against the edge of the kitchen counter, but use caution and wrap the jar in a towel first.
6. Wide rubber band
Consider this simple tool Martha Stewart uses for opening stuck jars — a rubber band. Many of us have a collection of odd-sized rubber bands cluttering a kitchen drawer. They have many uses, but this one isn’t as commonly known. That said, not any rubber band will work, so don’t reach for the skinny ones you’ve saved from bundles of scallions or herbs. The rubber band needs to be wide, and it needs to fit tightly around the jar. Choose one that’s wide enough to cover the entire side of the lid without being so wide it touches the side of the jar itself. This should give you enough area to hold on to. If you don’t have wide ones, you can try layering multiple rubber bands that are slightly narrower around the lid. The rubber band also needs to grip the jar tightly, so make sure it’s short enough to stretch around the lid and close around it tightly when released.
A rubber band works like the rubber gripper tool, although the gripper tool may work better because it covers more of the lid. To cover more area, place a dryer sheet or a piece of plastic cling wrap on the lid before attaching the rubber band. If you don’t have any of these items, try using dishwashing gloves for a similar effect. Wear two gloves — one can help you twist the lid while the other grips the body of the jar to help keep it in place.
7. Punch can opener
The punch can opener is a simple, inexpensive metal tool designed to open cans and bottles. One end, which opens bottles, is rounded with a small hole in the middle. The other end has a raised, sharp, pointy end which punctures the tops of cans with a triangular hole so that liquids such as soup can be poured out. Below both ends is a small raised rectangular piece, which rests against the outer rim of the bottle or can for stabilization.
Many people have a punch can opener in their kitchen, and some basic metal can openers with turning knobs include one built in. If you’re faced with a stubborn jar that won’t open, you can use the rounded bottle opener end of the tool to pry up the jar lid and break the seal. Then just twist the lid off. If at first the jar doesn’t open, try again in another spot. Don’t confuse this bottle opener with others that are wide and flat with a large hole, like at the top of a corkscrew. Those won’t grip the lid.
This is not the way a jar is intended to be opened, so take your time, especially since this method involves a pointy tool. If the lid gets too bent out of shape to screw back on and protect the food, then you’ll need to follow the same tips for storing opened canned foods in the fridge: transfer any leftovers to a separate airtight container to keep bacteria out and freshness in.
8. A heat source
Bathroom gadgets aren’t normally used in the kitchen, but some people use the heat of a hair dryer to loosen peel-and-stick backsplash tiles or removable hooks or to try to speed-ripen an avocado. A lighter is also a convenient tool to keep in the kitchen, and not just for lighting a gas stove or a candle. Either of these items can be used in a pinch to try to open a stubborn jar.
Both a hairdryer and a lighter are heat sources that can warm up a metal jar lid. The science is the same as it is behind the hot water method we discussed at the beginning of this article. Heat causes metal to expand, so applying heat to the tight seal of a metal jar lid should create enough expansion to loosen the seal and allow the lid to be twisted off.
To use a hairdryer, turn the heat to high and point the nozzle at the jar lid for a minute or two. Rotate the jar so the heat reaches all around the circumference of the lid. Alternatively, carefully run the flame of a lighter around the seal of the jar (where the lid meets the glass on the underside of the lid) a few times to heat it up. Now try to remove the lid, but use caution because the jar will be hot! Cover your hands with a dishcloth, gloves, or silicone oven mitt to protect them from the heat before twisting the lid off. Don’t use this method on plastic lids.
9. Hammer and nail
Hermetically sealing a container like a jar removes all the air inside and prevents new air from getting in. It also keeps microbes out so the food inside can stay safe over a long shelf life. When the air is removed, vacuum pressure is created inside the jar, which keeps the lid tightly sealed in place. Whenever we’ve mentioned loosening or breaking a jar lid’s seal, for example with a butter knife or the water hammer, this is the seal we mean. While using a tool like a butter knife is effective for opening a jar, it takes a little maneuvering to gradually compromise the seal. There is another way to do this that has an immediate effect. You can use something sharp to make a hole in the top of the jar lid. This will completely break the airtight seal and allow you to open the jar.
Some people suggest using a spiral corkscrew, but we think hammering in a sharp nail would be a less slippery method and thus be safer. Find a way to secure the jar in place before making the hole to reduce the chances of the jar moving and the nail causing injury. Finally, sterilize the nail before it has a chance to make contact with your food. We recommend trying other methods first since this one is riskier. And, like jars pried open with a bottle opener, transfer any leftovers to a separate airtight container before refrigerating.
10. Use a dedicated jar-opening gadget
So far, we’ve discussed how to open stubborn jars with common items many people already have lying around their kitchens or households. It’s convenient to try those first if you only run into the occasional hard-to-open jar. If you need assistance with this task more often, or if you just like to use nifty tools, consider purchasing a dedicated jar-opening gadget to get the job done easily, efficiently, and without running the risk of injury from overexertion or pointy objects.
There are numerous gadgets that come in many different shapes and sizes, but what they have in common is they grasp onto the lid and furnish the extra torque needed to get it open. Kitchen shears are recommended for grasping and opening stuck jars for the same reason, because they feature metal grips between the blade and handle. However, while dedicated gadgets may be more of an investment, they are easier to use and work better.
A multipurpose curved jar opener is a good choice for grasping and twisting a lid open. A V-shaped gripper jar opener may be even better because you don’t have to hold it closed, and it comes with a sturdy base pad. An adjustable straight jar opener is a simple and budget-friendly choice for those tough-to-open jars. Finally, if you want to go all out, consider investing in a battery-operated electric jar opener that opens jars at the touch of a button.


