
Deep-frying food is an art that culinary whizzes have gotten pretty good at. There’s not much that can’t be baptized in batter, whether that’s onions, potatoes, or Oreo cookies — so why not pickles? The mouthwatering appetizer is a staple at most bars, with the best baskets displaying a golden brown crust and juicy, snappy interior. Yet how often have you found yourself craving the sour crunch outside of happy hour? We get that. Luckily, crafting your own fried pickles isn’t too hard, as long as you have the right guide, and our expert tips below will help you get started.
Speaking with Jacob Hadjigeorgis, the owner and proprietor of Jacob’s Pickles, we managed to gather the restaurateur’s insights on the process. His establishment slings rib-sticking Southern cuisine in New York City, and pickles, of course, sneak their way into menu items. Sampling pickled variety platters is just one way to begin your meal ahead of its plentiful mains, but the Big Apple eatery keeps the wheel of innovation turning, including, at one location, a vegan pickle-infused soft-serve.
Delving into cooking oils, equipment, and the ensuing pickle shape debate will help bring the crispiest fried pickles of your life to your table. Cooking from scratch can be daunting, but with these tips on board, you’ll wonder why you ever waited.
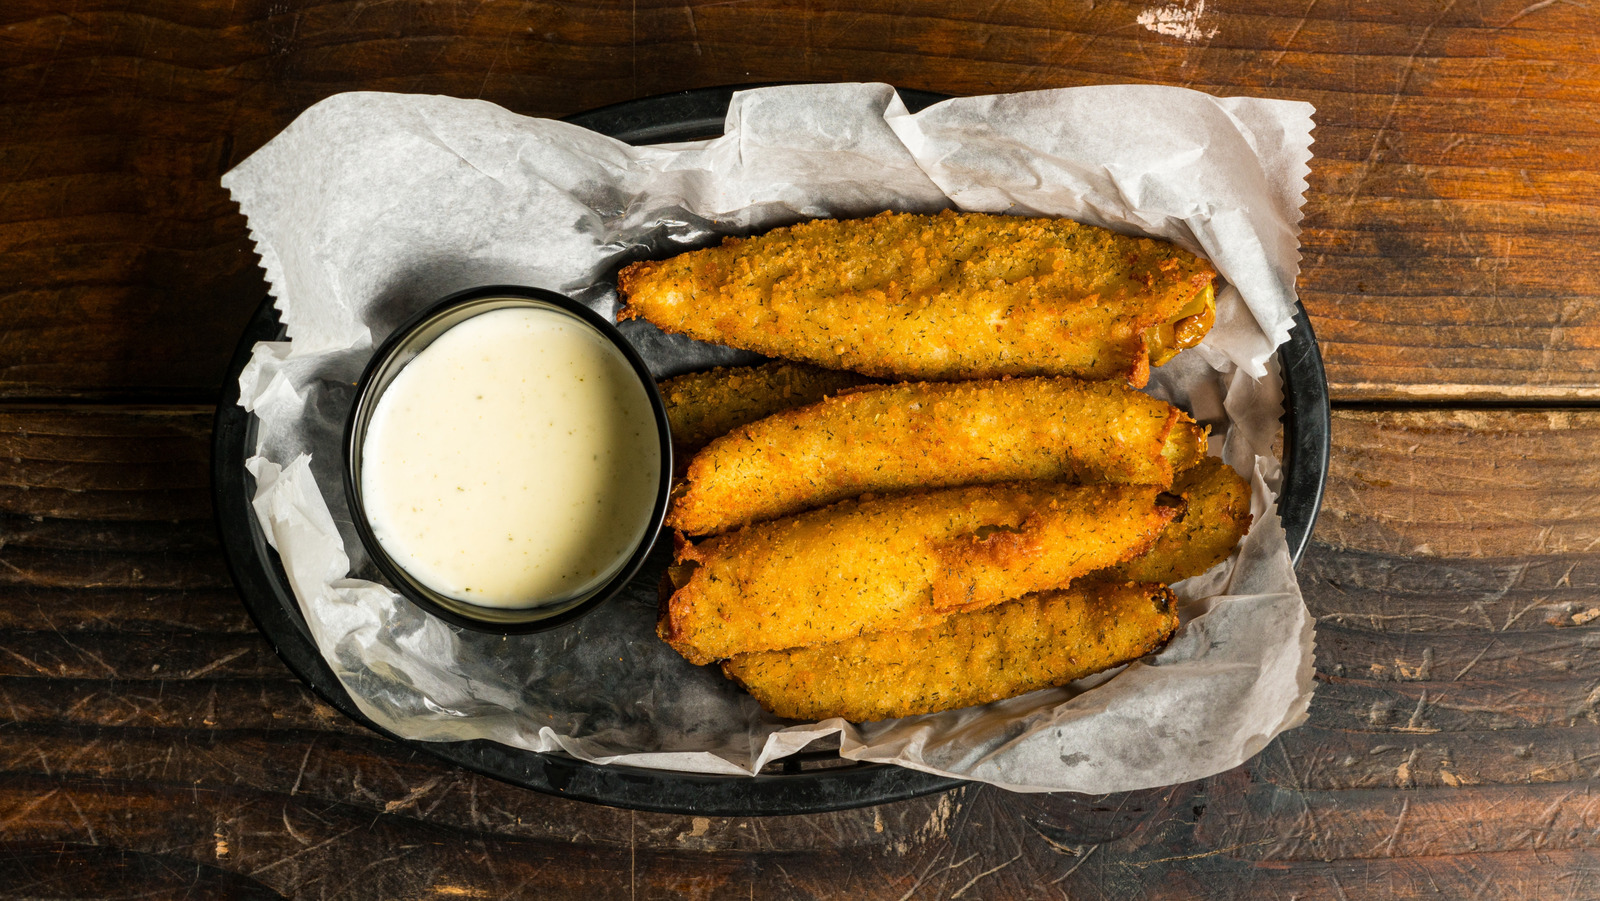
Put some thought into the pickle shape
Making fried pickles begins with — what else? — the pickle. In the battle between pickle spears and pickle chips, there’s simply one variety Jacob Hadjigeorgis favors for the task at hand. “Spears all the way!” As he explained, his affection for the oblong shape runs twofold: “We love thin spears because it features more of the pickle flavor than a typical chip shape and creates perfect balance between the ‘fried’ and the ‘pickle.'”
Pickle chips are also a popular style for fried pickles, as many professional cooks can attest. They’re bite-sized and don’t require much labor to prep outside of the jar. Feel free to give both shapes a whirl to see which you like best. If you really can’t decide, purchasing store-bought pickles to slice yourself might give you more leeway for experimenting. For making your own pickle chips, chopping them to a quarter-inch thickness should be the aim.
When you factor in the breading, grabbing whatever pickles are lying around makes a lot of sense since they’re heading straight into the fryer. But it doesn’t hurt to pick up a jar that’s high in quality so your fried pickles shine inside and outside of the coating. Claussen Kosher Dill Pickle Spears earn points for their delectable taste — and isn’t that an absolute must for showcasing a mouthwateringly golden exterior?
Blot the juices from your pickles
Raw pickles are extremely fun to eat, balancing juiciness with a bright, crunchy snap. Sitting in a jar of brine, though, makes them extremely slick and wet, and those traits are definitely not ideal for turning them into fried pickles. In order to gain an extra-crispy pickle, you’ll need to get rid of the extra moisture, should you want your batch to turn out golden brown after they hit the oil in your deep-fryer. Jacob Hadjigeorgis swears by this preparatory step if you want an appetizer on par with the professional restaurants. “Pat the pickles dry before coating and frying for the most crispy result,” he says.
Following whatever procedures you need to prepare the pickles, take a paper towel and press the sheet down, sopping the juices from the pickles thoroughly. If you like, you can also place the pickles on a paper towel so the towel absorbs each side of the vegetable. Leaching as much of the excess moisture as you can will help the coating to stick, and most importantly, stay on when it’s time to fry. With this technique in your back pocket, no pickle will be slipping or sliding out of its fried breading.
Opt for a dredge instead of batter
As you can see, crafting happy hour-approved fried pickles isn’t always clear-cut. One obstacle home cooks may run into is deciding what kind of breading will earn them the crispiest result. You might think a dredge or batter wouldn’t make a clear difference when frying this finger food, but it matters a lot. With dredging, a format where you switch between dry starch and a liquid component, such as eggs and milk, you’ll have a higher success rate of getting the pickles thoroughly coated.
Batter is a homogeneous mixture that combines the dry and wet ingredients. This doesn’t require a multi-step dip like a dredging set-up does, but the downside is your pickles will be missing some structural reinforcement. A base layer of starch beneath the liquid binder and second coat is foundational to helping the crust stay on, especially once it’s submerged in the hot oil.
We know it’s subjective, as some folks have encountered good luck with the batter method. But remember, pickles need a massive pat-down to skim off the moisture before they’re even tossed in the breading. The dredge method is key to upholding a crackly coating that your teeth will brace for in every bite.
Don’t skip the corn starch
One of the many joys of fried pickles is the browned, flaky exterior. But tell us, how many times has the craggy shell sloughed off the minute you pull out a wedge from the basket? That’s a real buzz-kill that no aioli sauce ever seems to save. If this greasy shedding occurs whenever you try your hand at the appetizer, your dry mixture might be in need of corn starch. This powdery substance, which is derived from the corn kernel, is often utilized to boost texture and help ingredients adhere together, including to make chicken breading actually stick. Therefore, adding some to your breading concoction is a no-brainer to help your coating cling and offer extra protection.
Professionals who make these bite-sized treats from scratch usually have this secret ingredient in their kitchens. Rumford Non-GMO Corn Starch and Clabber Girl Non-GMO Corn Starch are both gluten-free, making them versatile cupboard staples for the average home cook. As far as how much to add, your recipe may direct you to use a specific quantity — measurements can range anywhere from a few tablespoons to a ¼ cup.
Toss the pickles in a heartier breadcrumb
For fried pickles, achieving crunch is what it’s all about. The first thing you’ll taste biting down is the craggy breading encasing the sour interior, so make sure you pick out breadcrumbs with a coarser consistency. Tossing your spears in sharper crumbs will accentuate crevices for the oil to sizzle, creating that crackly finish of the basket at your favorite dive bar.
The crispiest fried pickles of your life depend on a nice shell, and Panko breadcrumbs offer magnificent flakiness in spades. These are the exact same breadcrumbs used in Japanese-style tempura. They’re rougher and chopped into larger shards than standard breadcrumbs, with a dryer consistency that’s less prone to turning spongy from oil absorption. 365 By Whole Foods Market Panko Bread Crumbs are solid, but just about any brand would do the trick.
Another component Jacob Hadjigeorgis reaches for to create the appetizer’s dry mix is masa flour. It’s a robust golden starch that’s derived from corn, commonly utilized to make homemade tortilla dough. He combines it with regular flour to give the binding sturdiness. A well-vetted choice like Bob’s Red Mill Organic Masa Harina Flour might be on the premium end, but with your basic All-Purpose flour, the upgrade will undoubtedly make all the difference between an okay and an amazing fried pickle platter.
Incorporate a fizzy liquid into the coating
Incorporating a bubbly component into the breading is a move professional dining establishments take to create an airy outer shell. It’s a common step chefs use to give fish and chips that glistening outer coat some crackle. By this logic, your pickles will greatly benefit from infusing the wet mixture with a little fizz, especially if you want to garner that “fast food” feel that’s so elusive.
Pickles are one of the best foods to beer-batter and fry, so use the opportunity to add in your favorite brew. A splash of light lager brings the bubbles, but it also imparts good coloring and a subtle depth. Another upside of an alcoholic beverage is that alcohol swiftly evaporates when fried, which leads to an extra crunchy result.
For those who don’t consume alcohol, nailing that airy coating is also possible with unflavored seltzer. Club soda is an easy way to amp up fried pickles because of the heavy amount of carbonation. When the fizziness reacts with the oil, it unleashes a chemical reaction from the carbon dioxide present, which produces the tell-tale “puff” we associate with deep-fried eats. Pour in a little Original Polar Seltzer Water (or any brand, frankly — nothing flavored though!) and see for yourself.
Fry your pickles in the proper oil
Fried pickles are not the dish to test out your fancy-schmancy imported olive oil. When seeking out the right oil for the job, the liquid shouldn’t have a noticeable odor or taste. Otherwise, you could overpower the toasted, sweet-and-sour goodness you should be enjoying instead, according to Jacob Hadjigeorgis. For all intents and purposes, a jug of Crisco Pure Canola Oil offers the plain profile for fried pickles to develop irresistible crunchiness naturally. “A neutral cooking oil like canola is always preferred to not interfere with the flavor of the pickle,” notes Hadjigeorgis.
Multi-functional oils like canola have the additional benefit of a high smoke point. For frying purposes, this is a big deal. Simply put, the oil’s tolerance in withstanding high temperatures helps shield it against burning, especially when compared to other types of cooking fats. When you raise the heat on your stove, there’ll be no need to worry about the oil’s integrity depleting, giving your breaded pickles a fantastic solution for sizzling to perfection. If you don’t have canola or vegetable oil, you’ll find peanut oil shares similar traits that are favorable for heavy frying.
Heat the oil to the right temperature
When it comes to deep-frying, there’s a need for speed. Most foods you dredge in oil go in, out, and away on a cooling rack within just minutes because the oil is sizzling-hot. Anything below lukewarm will cause the pickles to languish longer, growing mushy and less-than-crispy. There’s a way to banish this faux pas from your own cooking efforts, and that’s with this next tip. Make sure your oil is heated to just the right temperature. Without adequate heat, your party snack will not develop the super-powered crunch it deserves.
Heating your oil until it reaches 350 F, instructs Jacob Hadjigeorgis, is a perfect target for gaining a golden crust on the outside and a firm, tangy snap from the pickle. Depending on how efficient your stove is, 375 F is also a suitable temperature to aim for. Another piece of advice we’ve intertwined with this step? Don’t just eyeball the pot. Investing in a food-grade thermometer will provide an accurate result for the temperature, and it will give you much more confidence navigating other deep-fried projects on the horizon. A waterproof model like the Thermopro TP510 Waterproof Digital Candy Thermometer is a breeze to use, so you can get your appetizer out to wowing guests in no time.
Avoid frying larger batches
We understand the itch to dump all of your pickles at once into the pot — a grumbling belly couldn’t care less about procedure when there’s homemade buttermilk ranch to dunk away. But retaining a golden crunch from start to finish is the goal here. Resist the urge to cook a single large batch because you think it’ll be quicker than doling out a small handful into the vat at a time.
Overcrowding is one of the deep-frying mistakes that can ruin the crackly layer of breaded foods. When there are too many battered pickles vying for space in your pot, the temperature can drop, causing the oil to cool off and the pickles to cook inconsistently. They also risk sponging up extra grease, which is a surefire path to a mealy outer coating.
With a slotted spoon (you really don’t want to burn yourself), lower in around three to four pickles into the pot. By browning the pickles in smaller increments, each pickle has room to fry completely. They’ll also fry up quicker, too. A few minutes total (or per side, about 90 seconds) generally achieves the desired result. Your dipping sauce won’t suddenly disappear if you fry the pickles in installments, so stay patient. It more than pays off in the long haul when your fried pickles out-do your favorite restaurant’s!
A wire cooling rack keeps fried pickles crispy
Never underestimate how important it is to handle the pickles post-frying. When the moment comes to retrieve your frizzled cucumbers from the oil, where you set them to cool off can determine whether they’re ear-shatteringly crispy or a sad, sodden experiment. For instance, covering a plate with a paper towel or parchment paper seems like a sensible solution to a resting place, as well as minimizing the clean-up at the end. Unfortunately, condensation from the grease would soak into the paper and reduce your golden-fried efforts to a soggy mess.
To best maintain the textural strength of your fried pickles, take stock of your kitchen tools. Jacob Hadjigeorgis instructs using a wire cooling rack to lay out your fried pickles until they’re ready to eat. Cookware such as the Checkered Chef Baking & Cooling Rack will help the air flow and prevent grease from reabsorbing into the fried morsels, thanks to the rack’s uniform grid grating. What’s more, the stainless steel finish makes it easy to wipe down when you’re finished using it. Hadjigeorgis additionally recommends placing another pan below the cooling rack. This makes it so the steam emanating from your pickles can flow outwards, and away from your batch.


