
As an avid home baker, I can confidently say that pie has to be one of my all-time favorite desserts. It is relatively easy to customize it, since you can stuff it almost any sweet or savory filling imaginable. And that delicate, buttery shell is just the perfect foil to that delectable filling. Even though pies, and pie-making, come with many merits, there are also some less-than-enjoyable parts of the process that many bakers dread. And one of the most obvious ones, which I personally lament, is having to cut into the pie.
You can get a tasty filling and a golden-brown crust that looks like it just sprang up from a recipe book, but you will risk ruining it all if you go to cut it and find that your pieces are coming out mangled. And while the only thing that really matters is if it tastes good or not, you still want to serve a dessert you feel proud of. And messing up the serving part — which is literally last step in the process — can surely stifle your confidence. Luckily, I have curated some tips and simple hacks for slicing clean, perfect slices every time, whether your go-to is a classic apple or a cream-based concoction.
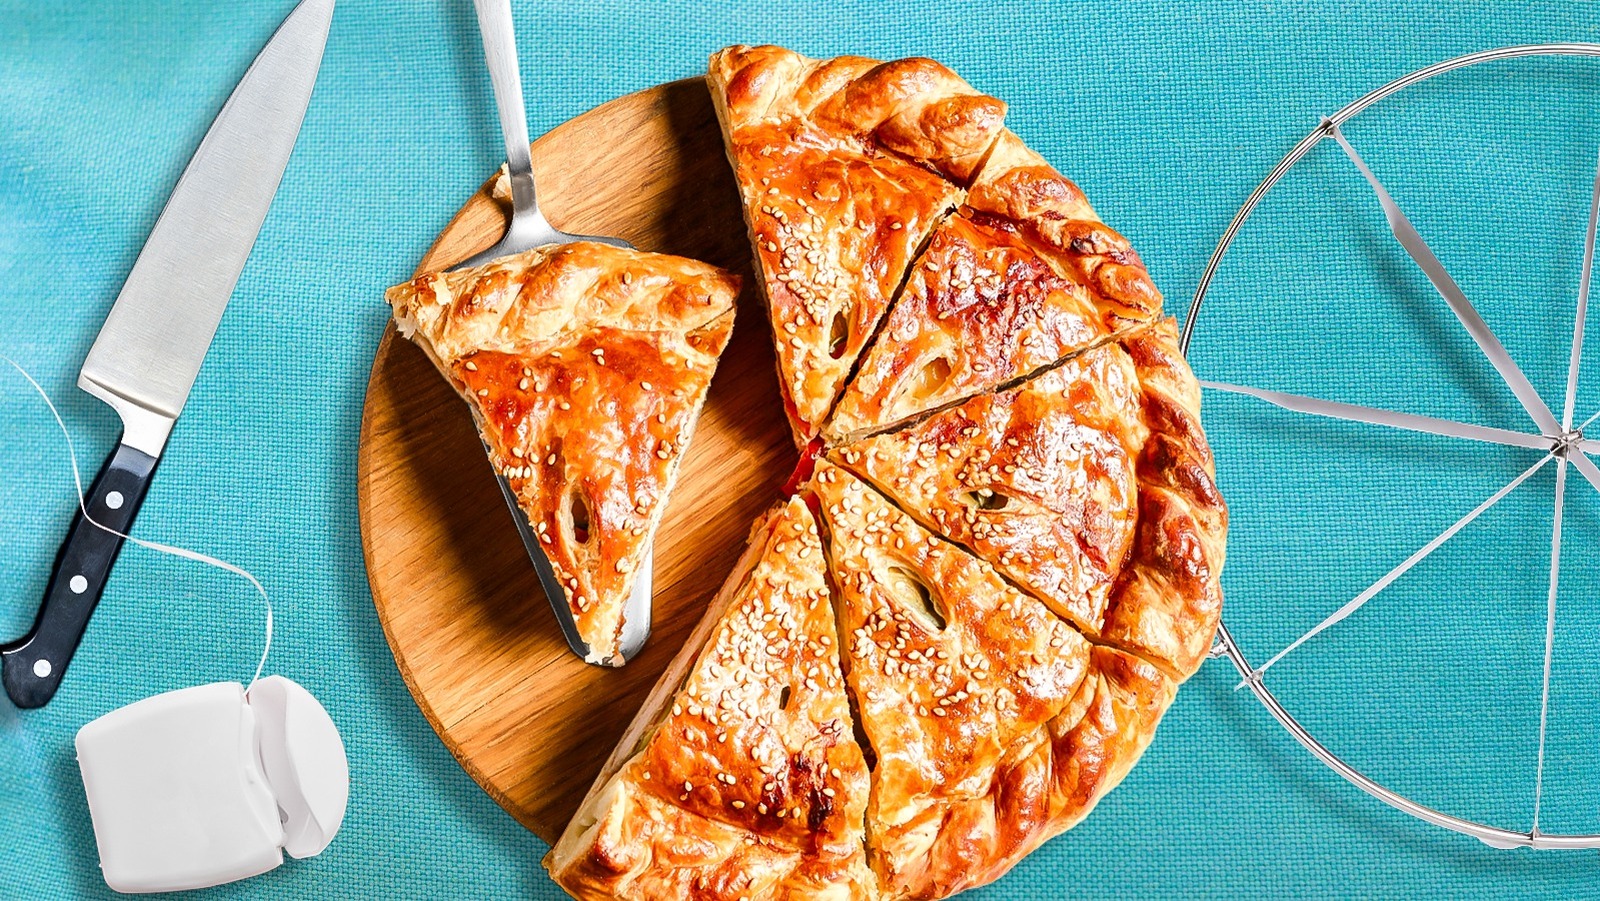
Pie scorers are your best friend
I did not learn about pie scorers until later on in own pie-making journey. And if I can say one thing, it is that I could have saved a whole lot of time if I had been in the loop a bit sooner.
Essentially, a pie scorer is a lightweight, handheld metal press that allows you to mark where the slices should be cut on a pie. While the pie scorer does not actually cut into the pie, it leaves shallow impressions that will show you exactly where to slice later on to get even slices. You can buy numerous different sizes, including everything from a six-slice to a 12-slice tool.
To use this took, gently press it down on the top of your pie until there is a small indentation. You do not want to put your whole bodyweight into it, as it can lead to cracking and more damage. Just a light touch will allow you to come in with a knife and slice up your cake evenly. A pie scorer is an especially invaluable tool for folks who are not gifted with the ability of cutting things evenly (speaking about myself, here), and it will ensure that your guests do not have to fight each other over who gets the biggest slice.
Warm up your knife before slicing
The “run it under hot water” trick works for a lot of different things in the kitchen — for varying reasons. Want to help unstick a jar or a lid? Run it under hot water. Need to slice through a stick of butter with ease? Dunk it into warm water. The same hack can be used for slicing cleaner pie slices, too.
You do not have to run your knife underneath your tap for long, either. All you need it to do is warm up the metal just enough that when it meets the fat-based crust, it will slice a bite easier. It is important to note that after you remove your knife from the water, you will need to dry it off before you slice into your pie crust. After all, you do not want it to be dripping water onto your perfect crust and making things soggy.
As you slice your pie, you will also want to make sure that you clean your knife blade off constantly, as any residual crumbs or debris can make your cuts messier than they need to be. Give your knife a rinse under hot water when you notice your blade starting to get super gunky before drying it and slicing again.
If you’re making a cream pie, use dental floss to mark the slices
If you do not make pies frequently, you may not feel the need to invest in yet another silly kitchen gadget just to score your pies. Luckily, one of the solutions to cleaner pie slices can actually be found in your medicine cabinet. A long strand of unflavored dental floss will help you make easier and straighter cuts through a tall, custard-based pie, like a coconut cream pie or a lemon meringue pie.
You will want to make sure that your string of floss is long enough to fit across the whole diameter of the pie. Then, make your first straight line by holding the floss taut and pressing it gently into your pie. From there, you can lift it up, position it horizontally, and mark the pie again into quarters. Continue until you have your desired number of slices.
This hack would work well if you are working with a cake that is especially tall, like one with a meringue topping. If you used a pie scorer instead.of the floss, you may risk deflating the center of the pie when you press down on it. The floss trick is an easy, and disposable method (because who needs one more thing to wash?) to divvy up your slices evenly.
Try cutting multiple slices before you remove them
Have you ever noticed that the messiest pie slices always happen when you are trying to jostle a single piece of pie out? This is likely because there is not a whole lot of room for that individual slice to move. The cut sides are rubbing against the rest of the pie, in turn creating friction and breakage. The solution to cutting a cleaner pie slice is to make several cuts in the pie before you go to pull that slice out.
You will need to cut at least three times (which will make two slices) to give yourself enough wiggle room and reduce the friction. Once you have those two slices done, you can remove them from the tin and start making your way around the pie for the rest of the cuts. This hack reduces the risk of the dreaded “first slice” — which you usually are not very proud to serve to even the hungriest of guests — and it will make the rest of your cuts cleaner overall.
Use a fan to cool down your pie faster
One of the biggest mistakes you can make with any pie is not letting your filling cool down before you slice into it. If you have ever made a fruit pie and pulled it from the oven, chances are that you can still hear it bubbling and cooking even after it has left the heat. This because the filling is still juicy, rather than set. The exact amount of time that you will need to allocate for your pie will depend on not only the variety you are making, but also the thickener you are using, as each of them requires a different amount of time to completely coagulate the residual juice.
Your inclination might be to put the pie in the fridge or freezer to chill it faster, but this is something you should avoid doing. A hot pie plus a cold fridge can equal condensation — which will turn your crust soggy. Instead, I would recommend placing your pie on a cooling rack so that air can circulate underneath it and cool it faster. You can also try the simple hack of pointing a fan at it. The circulating air will gently cool your pie and ensure that the filling sets — without shocking the entire pie and altering its texture.
Add a ‘sponge’ to the bottom of your crust to soak up excess moisture
Any fan of “The Great British Baking Show” will tell you that soggy bottoms are one of the most important things to avoid when baking pies, tarts, and the like. When there is too much moisture trapped in that bottom layer of pie crust, it not only will struggle to come out of the tin, but may also still be raw or too wet to be enjoyable. Luckily, there are several methods you can utilize to counteract the infamous soggy bottom. The first is to blind-bake or par-bake your pie crust if you are making something like a pumpkin pie, as this will give your crust a head-start and ensure that it bakes on a similar timeline as your filling. You can also use a thickener, like cornstarch or flour, in the filling and prevent the juices from seeping into your crust. But, one trick that you may have never thought of is to use a “sponge” of sorts to soak up the excess moisture.
For this hack, you will want to add a scoop of graham cracker crumbs, wafer cookies, or even bread crumbs to the bottom of your pie tin before you set your crust into it. If any moisture seeps underneath your crust, it will be soaked up by the dry crumbs — not by the pie crust. You’ll only need about a teaspoon for a standard-sized pie, as you do not want to make it too obvious that it is there. If you add too much, it will mess with the texture of your pie and may impart an awkward consistency.
Make slicing easy with a small utility knife
You might be racking your brain as to what kind of knife you should be using to cut through your pie crust. And it turns out, there are a ton of options that you can use. Although it might seem a bit counterintuitive, your best bet is going to be a serrated knife. The blade will grip the crust with ease and saw straight through it, whether you are working with a double-crusted apple pie or a more delicate chocolate cream. There is very little compression that occurs with this blade, as opposed to something like a chef’s knife. In the latter case, you would just be putting pressure down on the crust and the filling and squashing it. When I cut pie, I opt for a small utility knife rather than a large blade (which I would use for something like a homemade bread loaf) because the smaller blade is easier to maneuver in a small tin.
While there are great knives that you can use for this hack, there are also ones that you should stay away from. Mainly, the dull butter knife. While it is likely that everyone has a butter knife in their kitchen, it should not be the first thing you grab when it comes time to slice your pie. This blade will just break through your crust and cause it to splinter into pieces.
Cut a sliver out before you cut for real
We all know that the first slice of pie is never the best one. So, why would you want to cut a massive slice of your work, only to have it come out looking like it just lost a fight with a bear?
Instead of wasting a massive first slice, cut a small sliver and let that be your sample slice. That way, you can minimize the amount of pie you have to “waste” (read: scarf down shamelessly in the kitchen as you are slicing the rest of your dessert). Removing this small sliver will also give you some more wiggle room to move around the pie and pull more slices from it. Plus, you will still get to enjoy that small sliver of pie as a little taste test before you have to serve the rest of it away to all your awaiting guests.
Slice through the pie a few times before trying to pull out a slice
The chances that you are actually going to slice through both the top and bottom crust on your pie seamlessly on the first shot are miniscule. Therefore, you may need to pass through the crust several times with your knife to make sure it is fully cut-through before you remove your slice.
You might assume that running the knife through several times is a little bit overkill. But, when you think about it, the process is separating the crust and the filling, which will reduce the amount of debris that will be left behind when you remove the slice. Running the knife through completely will also halt any issues with the tip of the bottom crust sticking and escaping your incoming pie server.
Use a pie server to transfer the slice to your plate
We have all thought that we can be Superman and remove the pie slice with just a skinny little butter knife for support. But this is a precarious game that, in all honesty, is not worth playing. It would be too easy to shift the piece off balance and force it to fall down back into your pie crust. If only you had a specially designed and aptly-named tool for serving pies… oh wait.
If you are making and serving pies frequently enough, it may be worth it to purchase a pie server. This kitchen tool is an essential for picking up slices of pie and transferring them from the tin to your plate with ease. You can get them in several different materials, including plastic and metal. If you want a little extra help, purchase one with a push release lever that will easily allow you to slide your pie (or cake) from the tool onto the plate, eliminating the need for you to give it a little push with your fingers. Though some pie cutters come with serrated edges for cutting, I would recommend not buying them (or at least, not using the blade for cutting), as they are awkward to slice with and difficult to maneuver. And, the last thing you want is to run your hand, or the handle, into the pie itself.
Garnish to cover up the damage
Perhaps the best and most delicious hack of them all is this one. We have all had pie crusts that look a little worse for wear, but ultimately, the only thing that is going to matter in the end is that it tastes good. Luckily, you can hide a rustic-looking pie quite easily with a garnish — and it will also make it taste all the more delicious.
A scoop of ice cream is easy to pair with your respective pie variety, but you may also want to consider dolloping on some homemade whipped cream if you are after something a little lighter. Sauces, like a bourbon caramel, chocolate, or even a crème anglaise, can hide some of slice marks on your pie crust and make it look all the more appealing. That being said, you want to keep the ratios between the pie and toppings in mind, as you still want your pie to be front-and-center of every bite.


