
Beef Wellington is one of those dishes that proves you’re a boss in the kitchen. Whether or not you get a heart attack after eating it is another matter, but being able to make a serviceable Wellington for your next casual get-together or holiday is a true test of any home cook’s mettle. You just need the right tips, or it will become a big, sad, soggy mess.
Although beef Wellington seems like ancient history, it was actually invented around 200 years ago in celebration of Arthur Wellesley’s victory over Napoleon at Waterloo (cue ABBA). Wellesley earned the title “Duke of Wellington” after the victory, and what better way to celebrate this feat than with a giant roll of meat, fat, and carbs? In the last few decades, this dish has seen a resurgence, largely thanks to star chef Gordon Ramsay, who has proudly declared that beef Wellington would make it on his last meal menu.
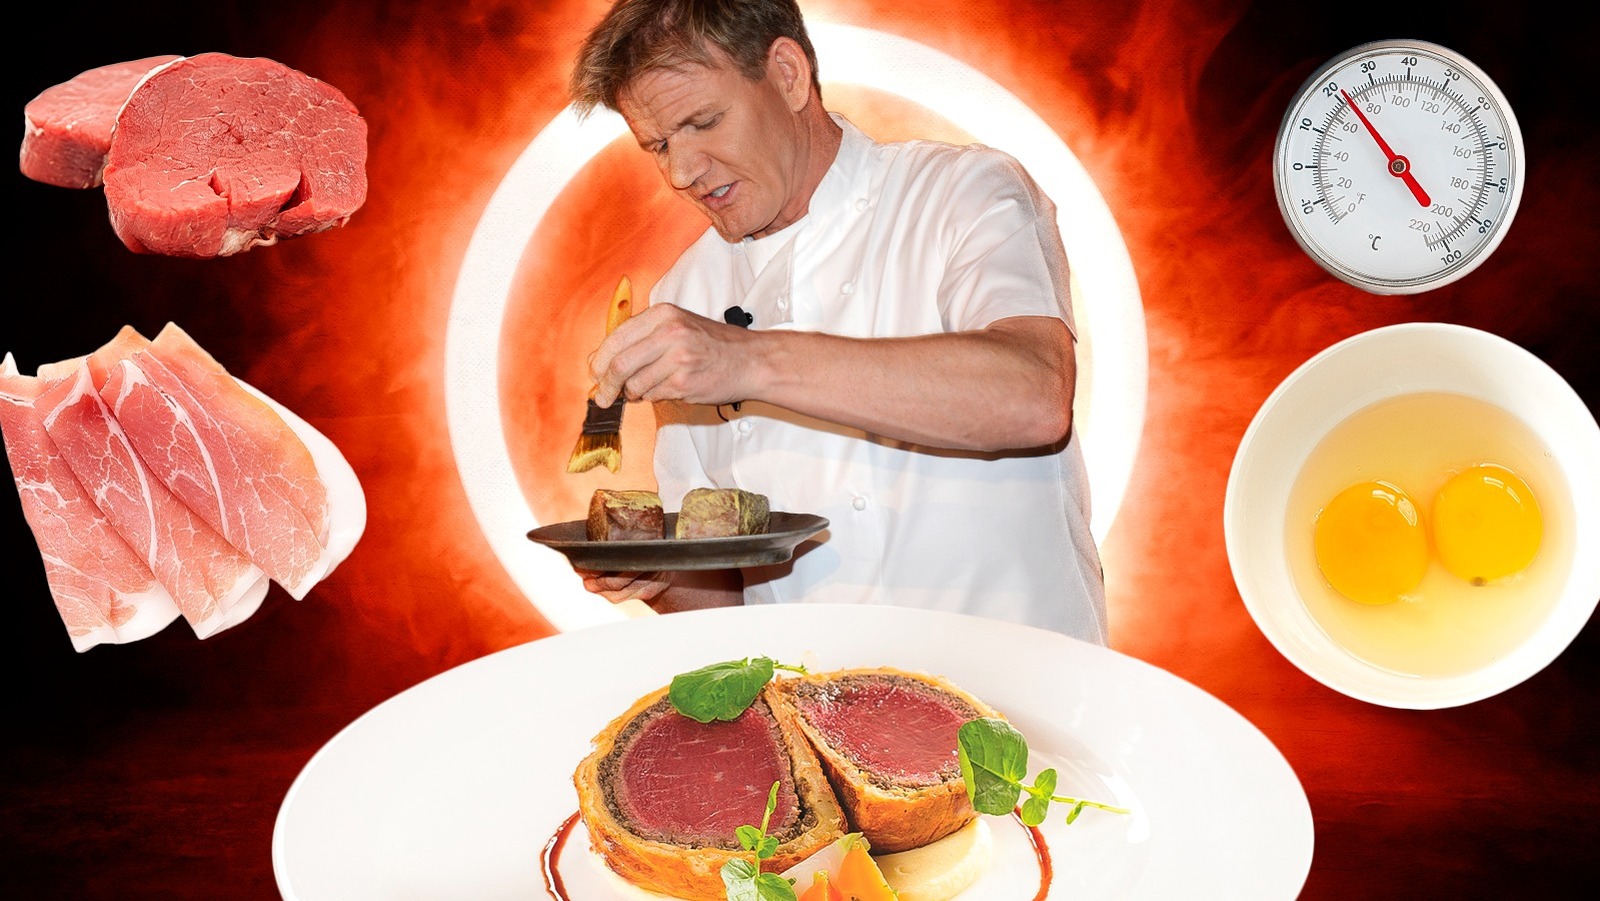
Gordon Ramsay is known for modernizing beef Wellington and bringing it to tables around the world, so naturally, Chowhound had to sit down with a member of his camp to get the goods. Robert Camacho, executive chef at Gordon Ramsay Hell’s Kitchen at Caesars Palace, was delighted to take us through the following tips, with help from other pro chefs. Get ready to tackle Wellington right.
1. Choose the right cut of beef
Tenderloin is the most succulent part of the cow; “tender” is right in the name, after all. It’s the cut of meat from which filet mignon comes, if that tells you anything. “The tenderloin is lean, tender, and cooks evenly, making it ideal for the dish,” Robert Camacho says, which is why it’s the traditional choice for chefs.
Although tenderloin has very little fat, and therefore less flavor on its own than other cuts (which is why you might want to avoid ordering it at a steakhouse), that’s not a problem for Wellingtons because there’s plenty of other flavor going on. Between mushrooms, mustard, prosciutto, and pastry, you don’t have to worry about a lack of flavor. There’s another benefit to this cut as well: Because it cooks so evenly and has little fat, explains Brian Walter, executive chef at 87 Sussex, “very little or no juices run when the Wellington sets.” This is important, because it means you don’t get a gooey mess when you slice into the pastry.
Is there any wiggle room for the price-conscious cook? Um, pretty much no. “Only beef tenderloin,” emphasizes James Callery, executive chef at Cross Keys Newbury in the United Kingdom. “It’s lean, tender, and doesn’t need a steak knife or dental work to chew. Any other cut is blasphemy.” So if you’re going to do it, do it right.
2. Sear the beef properly
“Searing the beef is essential to develop flavor,” Robert Camacho explains. “This will lock in the juices and enhance the flavor.” Choose a pan with a heavy bottom that will distribute heat well, such as a Lodge 10.25-inch Cast Iron Pre-Seasoned Skillet or a Tramontina Tri-Ply Clad Stainless Steel 6-Quart Braiser Pan with Lid. If you want to get the best effect and are willing to spend, Brian Walter advises a Rondeau.
Whatever pan you use, note that this isn’t an optional step. Browning actually changes the physical makeup of your tenderloin through a process known as the Maillard reaction, causing chemical changes in the arrangements of sugars and amino acids. The recombined molecules are responsible not only for the browned look of grilled or roasted meats, but also for the deep, rich, umami aroma and flavors we associate with them.
Before you ask, yes: There’s a right way to sear your tenderloin. First, add a little oil to the pan and season your beef with salt and pepper. “Lots of it,” James Callery says. “Sear in a screaming-hot pan for about 60-90 seconds per side until it has a deep brown crust. No moving it around. No poking it. Just let it develop that flavor-packed golden exterior.” You may find that tying your beef tenderloin with a product like Regency Wraps Butchers Cooking Twine allows you to keep the tenderloin in an even cylinder while you brown the exterior. Afterward, you can remove the string.
3. Make a mushroom duxelles
While you let your beef rest, it’s time to make a mushroom duxelles. “This step is critical for adding flavor,” Robert Camacho says. “Finely chop mushrooms (preferably cremini or button mushrooms) and cook them with butter, shallots, garlic, thyme, and a splash of white wine until the moisture evaporates and it becomes a thick paste.” It’s critical to cook the duxelles until it becomes truly dry, James Callery cautions.
Once the paste has come together, let it cool completely. If you spread it on the pastry while it’s still warm, Camacho says, it can prevent it from cooking properly in the oven, leading to a soggy mess. If you want to make your duxelles ahead of time, you can keep the mixture in the fridge for up to four days, but ideally, you should use it in your Wellington soon after making it (once cool).
4. Layer tenderloin with mushrooms, prosciutto, and mustard
Leakage is a significant concern with beef Wellington, because fat or meat juice coming from the interior can ruin the pastry case and make for a final soggy result. Because you slice and serve the wheels of meat and pastry round-side-up, there’s no hiding soggy pastry on the bottom, either. Hence the care taken with assembling beef Wellington to avoid sogginess, which starts with how you layer it.
First, you start with your seared beef tenderloin, making sure your ingredients are at room temperature. Otherwise, Robert Camacho says, you risk soggy pastry. Letting your tenderloin cool also gives the juices inside time to redistribute, so they won’t leak out when you cut into the final product. Once cool, coat your tenderloin in a thin layer of mustard, such as Grey Poupon Dijon Mustard. “Dijon mustard is non-negotiable,” James Callery says. “It cuts through the richness, adds acidity, and enhances flavor. If mustard isn’t involved, don’t even call it a Wellington.” Plus, Brian Walter adds, it helps the duxelles stick to the meat.
From there, you apply a layer of mushroom duxelles. However, Robert Camacho cautions, “Don’t overdo it. Too much can make the Wellington soggy or cause the pastry to tear. A thin, even layer is enough.” Next, he continues, “Lay prosciutto over the filet after the mushroom duxelles. This acts as a barrier to keep the pastry from becoming soggy and adds extra flavor. Be sure to wrap the beef tightly.” A product such as Creminelli Italian Sliced Prosciutto should do nicely.
5. Use a good quality puff pastry
No, you don’t need to make your own puff pastry. (Even Dame Prue Leith prefers to buy her puff pastry at the store, as she reveals in her cookbook “Life’s Too Short to Stuff a Mushroom.”) That doesn’t mean you should use any ol’ product, though. “You want a flaky and buttery puff pastry that holds up during baking,” Robert Camacho says. “If using store-bought puff pastry, choose a high-quality brand to get the best results.” Opt for something with good reviews, such as Pepperidge Farm Puff Pastry. If you do decide to make your own, Camacho adds, “Ensure it’s chilled so it doesn’t become too soft and difficult to handle.”
If you’re terrified of soggy pastry, James Callery suggests using crepes to act as a barrier between the fillings and the outside layer, preventing leakage and keeping the puff pastry as flaky as possible. As Brian Walter explains, “Chefs have added crepes to keep the Wellington layers tight inside the pastry. This makes it cleaner looking when it’s cut and basically holds the dish together very nicely for presentation.” For the most part, though, Callery says that “prosciutto does the job beautifully.”
An alternate one-step beef Wellington upgrade to keep the juices in? A layer of phyllo, which helps to prevent leakage by creating a barrier through thin, crispy sheets of pastry. No matter what, Callery cautions, make sure to roll your puff pastry out thin. “Thick pastry is just sad.”
6. Wrap and chill the beef Wellington
“Before baking, chill the entire wrapped beef Wellington for at least 30 minutes to firm up the pastry and beef,” Robert Camacho advises. “This helps it keep its shape and ensures an even bake.” First, refrigeration helps to get the pastry nice and cold so it can recover from being worked by your hands. That’s important, since only the coldest butter will create a nice injection of steam when it hits the oven, thereby inflating your puff pastry. If you don’t give it a chance to firm up, Brian Walter says, your butter will just melt out of the pastry instead.
Plus, wrapping tightly with a product like Glad Press’N Seal Plastic Food Wrap is a classic way to set the ingredients, Brian Walter says. “It makes the Wellington perfectly uniform, so it finishes cooking evenly, plus looks tight for presentation.” It also helps ensure that the pastry hugs the beef properly, James Callery says. “No plastic wrap? Say hello to a lumpy mess.”
7. Brush with egg wash for a golden color
Next up: egg wash. “Brush the outside of the pastry with a well-beaten egg wash (egg yolk and a little water) for a beautiful golden-brown finish,” Robert Camacho says. “Make sure to brush it evenly, covering all areas.” A good pastry brush, such as the OXO Good Grips Silicone Basting & Pastry Brush can help here. “For extra crispness, you can score the top of the pastry in a light pattern before brushing it.”
Another benefit of egg wash? “It makes the crust a bit stronger and easier to cut,” Brian Walter says. “I like to egg wash the puff pastry before I let the Wellington chill in the fridge. This technique helps ensure uniform golden-brown color.” Lastly, it seals the pastry, helping to minimize leakage, James Callery says. And in general, “Your Wellington will look drier and less inviting without it,” he warns.
8. Use a baking sheet pan with a rack
It’s important to give the Wellington hot airflow from all sides if you want a uniform result in the oven. “If possible, place the Wellington on a wire rack on a baking sheet to allow air circulation,” Robert Camacho says. “This helps the pastry cook evenly and crisp up all around.” If you want to save trouble matching rack size to pan, buy the two together, such as with this Wildone Baking Sheet & Rack Set.
It might sound a bit finicky to buy specialty pieces of equipment for one dish, but such steps are critical to the final result. If you follow them, James Callery says, “you’ll have a perfect, golden, flaky, medium-rare beef Wellington. Ignore them, and you’ll have an overcooked, soggy disaster that even your dog might turn down.” (Like, maybe not *your* dog, but Callery probably knows some fancy British dogs that are more discerning.)
9. Bake at the right temperature
Beef Wellington recipes diverge on exact cooking temperature, but in Hell’s Kitchen, Wellingtons go in at 425 F. The only problem is that ovens vary quite a lot. It’s not enough to bake at the right temperature and call it good. The typical oven is off by 25 to 50 F, believe it or not, a difference that can definitely affect the final result. Always keep an eye on your pastry, no matter what temperature recommendations you adhere to, Robert Camacho says. Otherwise, you risk burning it.
If you have serious concerns about the accuracy of your oven (for instance, this writer’s oven routinely finishes baked goods in 5 to 8 minutes less than the recipe calls for), then you might want to look into calibrating it. Your manual should have directions for doing this. If you’ve lost your manual or never had it in the first place, check your oven’s model and look up the instructions online.
10. Monitor the temperature
Remember how ovens vary a lot? For that reason, Robert Camacho says, you should always monitor your beef Wellington carefully, even if you have recently recalibrated it. His advice? “Use a meat thermometer to monitor the internal temperature of the beef. For medium-rare, aim for about 125 F when removed from the oven. For medium, target 130 to 135 F.”
Keep in mind that the meat will rise a few degrees as it rests, so you should undershoot. For that beautiful pink color throughout, Brian Walter says, shoot for a final temperature of 128 F. An instant-read option such as the ThermoPro TP03B Digital Meat Thermometer will help you react quickly if the temperature is rising.
While recommendations for how long to cook the beef Wellington vary online, Gordon Ramsay’s recipe limits cooking to between 15 and 20 minutes for best results, or even a bit less: 14 minutes for the perfect medium-rare, Camacho says. This allows the outside to get nice and browned while keeping the inside from overcooking.
11. Use a pastry shield for protection
One of the hallmarks of beef Wellington is the color. It should come out golden brown and shiny. Underbake it and the dough will look matte and pale; overbake and it will emerge brown or — heaven forbid — even blackened. Protecting the appearance of your pastry is paramount, but you shouldn’t just remove the Wellington as soon as you see golden brown crust, because it might not be cooked inside.
What’s a home cook to do, then, if the meat isn’t registering a high enough temp but the outside looks done? “Make a makeshift pastry shield out of aluminum foil,” Robert Camacho advises. He recommends using it “to cover the top of the Wellington during the final stages of baking.” That way, you avoid getting any more color on it, but you can still make decisions based on the thermometer.
12. Rest before slicing
Just as you rested your tenderloin after searing it, you must rest it again before serving. “Allow the beef Wellington to rest for about 10 to 15 minutes after it comes out of the oven,” Robert Camacho says. “This helps retain the juices and prevents them from spilling out when you slice it.” But don’t tent it or cover it with anything, or it could get soggy. Just leave it on the rack in the pan where it was cooked, and you should be fine.
If you fail to take this step, James Callery warns, you’ll ruin everything you just worked so hard for. That’s because the beef muscle fibers are tight while hot, but begin to relax as they cool so they can reabsorb those juices. Resting for a few minutes ensures that the beef becomes evenly moist and liquid stays in the meat where it belongs.
However, when you first make a beef Wellington, you might want to err on the side of caution, since it may not need to rest as long as you think. “Wellington does not really need to rest much when it comes out of the oven,” Brian Walter says, “because we already let the tenderloin rest after it was seared.” Experiment with how long it takes, but don’t overdo it or your pastry could lose its crispy appeal.
13. Serve with a red wine demi
A good lubricant never goes awry when it comes to meat, and beef Wellington is no exception. “A rich red wine reduction sauce pairs beautifully with beef Wellington,” Robert Camacho says. The classic Gordon Ramsay recipe includes olive oil, shallots, peppercorns, bay, thyme, red wine vinegar, beef stock, and the eponymous red wine. You should also ask your butcher to save the beef trimmings when prepping your tenderloin. Browning them in a hot pan before making the reduction in the same pan will give it unparalleled depth. Serve each slice of your finished Wellington with an accompaniment of sauce.
Beef Wellington is, admittedly, a complex recipe — that’s why we’re so impressed when someone does it well. So keep experimenting. (Alton Brown, for instance, makes a Wellington from pork, one of his favorite foods.) You can also use other proteins such as salmon, Brian Walter says, but then you shouldn’t technically call it a Wellington. It’s up to you, of course; what happens at the dining room table, stays at the dining room table.
Lastly, don’t give up. As Raj Koothrappali from “The Big Bang Theory” told his friends, “If you don’t want to look foolish doing something, you should practice. Do you know how many beef Wellingtons I made by myself before I invited you guys over? I’ll give you a hint. You can see them here, here, and here.” (Ignore where he was pointing, because no one should have to think about their waistline at Wellington time.)


