
They’re a go-to for quick, hassle-free dinners and can save the day when you’re low on fresh ingredients, but canned foods can also be the secret ingredient in some seriously delicious desserts. Easy to use and typically boasting a conveniently long shelf life, those cans sitting at the back of your pantry offer a surprising amount of versatility. Creamy fillings and sauces can be transformed into indulgent treats, whilst pre-prepared fruits can make baking a breeze. All you need is a little inspiration!
Using canned ingredients, you can create anything from a quick two-ingredient mashup to a show-stopping cake. Canned peaches become infinitely more elegant with a dollop of whipped cream, and even something as simple as condensed milk can add a touch of luxury to sweet dishes. Amazingly, all of the dessert ideas we’ll dive into below require relatively little effort. Some are baked, some are chilled, and they can be whipped up with ingredients you likely have in your kitchen already. Most importantly, they all make the most of the delicious flavors and textures that canned foods can provide.
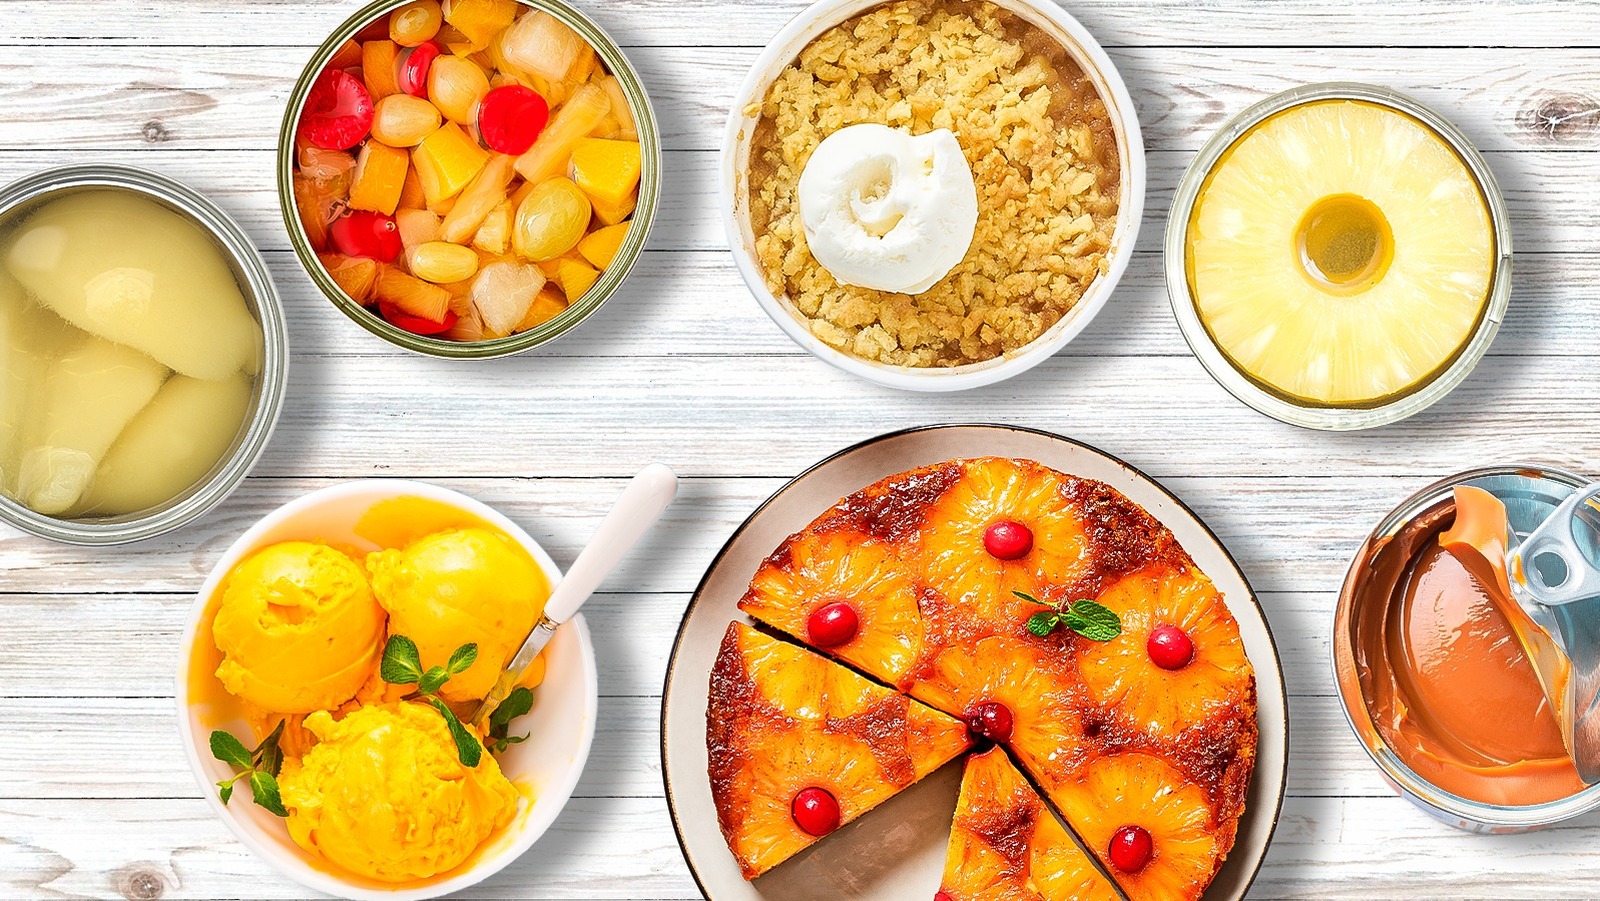
So, read on to discover a mouthwatering selection of treats that simply wouldn’t be the same without the convenience of canned foods.
Bake a pineapple upside-down cake with canned pineapple rings
If you’ve experienced the sweet, tropical deliciousness of a pineapple upside-down cake, you’ll have marveled at the perfectly cut rings of pineapple that sit atop the buttery sponge. These, of course, come from a can. Thanks to convenient canned pineapple rings, this retro bake is incredibly easy to make, with no peeling, slicing, or coring required.
The first step in creating this fruity favorite is pouring melted butter into the bottom of a cake pan. A round pan is most commonly used here, but you can absolutely opt for a loaf-style cake instead. Sprinkle brown sugar over the melted butter, then arrange the drained canned pineapple rings on top. If you’re pushed for space, just cut some of the rings in half. Maraschino cherries are a popular addition here, too. Pop these in the middle of the rings, and in any other gaps, if desired. Now, prepare the cake batter. Start by creaming butter and sugar until smooth and fluffy, then add eggs, vanilla extract, sour cream, and pineapple juice, and mix to combine. Fold in flour, baking powder, and salt, and spoon the batter on top of the syrupy pineapple and cherries.
Once baked, let the pineapple upside-down cake cool slightly before flipping it onto a plate. The cake should be gloriously sticky, with the glossy rings of pineapple creating a gorgeous, caramelized topping. Serve it warm with a scoop of vanilla ice cream for the ultimate comforting treat.
Top canned peach slices with honey whipped cream
Peaches and cream — it’s a timeless combination. After all, the sunny sweetness and soft texture of peaches make them perfect for pairing with a light, fluffy topping. And that’s where honey whipped cream comes in. If you usually sweeten your cream with sugar, we urge you to make the switch to honey. It adds a distinct, delicate taste that enhances the richness of the cream to no end, and this simple homemade creation couldn’t fit more seamlessly into a bowl of peach slices.
Obviously, we’re using canned peaches here, because who wants to waste time chopping? Just give the fruit a quick drain, reserving some of the juice or syrup if you’d like, and portion the slices into bowls. To prepare the cream, start by placing your mixing bowl and the beater attachments from an electric hand mixer in the freezer. After about 10 minutes, they’ll be nicely chilled. This will help the cream to whip up wonderfully light and fluffy.
Add the chilled heavy cream to the bowl, along with the honey (about one tablespoon of honey for every cup of cream is a good ratio to stick to here). You can also throw in a splash of vanilla extract for extra flavor, and pinch of salt to balance the sweetness. Then, using your electric whisk, whip the cream for a few minutes until you have stiff peaks, and it’s ready for dolloping on top of the peaches.
Use canned pears in a crumble
Crumble has to be one of the most versatile desserts going, with an array of different fruits tasting magnificent alongside that crunchy, buttery topping. Apples, rhubarb, and plums are popular choices, but pears are another fantastic option. They’re sweet and tender, yet hold their shape well, and also pair well with other fruits and spices. And yes, you can certainly use the canned variety here.
Whilst some fresh fruit crumble recipes call for pre-cooking the fruit, canned pears can be topped with the crumble mixture right away. Just drain the pear halves or quarters and place them into a large oven dish. You can chop the fruit into smaller pieces, but this isn’t essential. Next, mix the crumble topping. Combine oats, flour, and cinnamon in a bowl, then rub in cold, cubed butter. Once you have a breadcrumb-like consistency, stir in some sugar, and then sprinkle the crumble mixture over the fruit to cover it completely. Bake until golden on the top and bubbling at the sides, and serve with your favorite toppings, such as custard, ice cream, or a drizzle of salted caramel sauce.
Spoon canned caramel sauce over caramelized bananas
Delightfully indulgent and incredibly versatile, canned caramel sauce is a must-have pantry staple. One of our favorite ways to use this pleasingly sweet treat is drizzling it over caramelized bananas to amp up their buttery sweetness even further.
Caramelized bananas can be prepared in multiple ways, and frying them in a skillet is a great option. Just slice the fruit into rounds or lengths, add it to the pan with melted butter, and sprinkle over some brown sugar and cinnamon. Cook for about eight minutes, flipping the pieces over halfway through cooking, and they should come out perfectly soft and golden brown. Alternatively, try baking banana slices in the oven, giving them a quick coating in melted butter and sugar beforehand. You can even make them in the air fryer, which will save you both on time and effort, and give each banana piece a beautifully crisp exterior.
When your bananas are fresh out of the skillet, oven, or air fryer, all that’s left to do is add the caramel. Simply crack open the can, dig your spoon in, and drizzle a generous amount on top of the warm fruit. This combo is outstanding as is, but also brilliant with a scoop of ice cream, or when used to top pancakes or waffles for a next-level breakfast.
Drizzle condensed milk over French toast
Often reached for when whipping up a batch of no-churn ice cream or chewy homemade fudge, canned condensed milk is sure to bring heaps of richness and sweetness to any dessert. And one unique yet totally delicious way to enjoy it is drizzled over a stack of French toast.
When spooned over the golden, crispy bread, condensed milk serves as a wonderfully sticky, creamy topping, which makes the dish feel even more dessert-like. In fact, condensed milk is an essential component of Hong Kong-style French toast. This dish consists of two slices of thick-cut milk bread, spread with peanut butter and sandwiched together, dipped into a mixture of milk and egg, and shallow-fried until golden brown. To serve, the French toast is topped with a pat of butter and smothered in condensed milk, which can be added straight from the can.
Of course, this sweet, canned ingredient can be added to any type of French toast, whether that’s one made with banana bread, stuffed with Nutella, or baked in the oven. Whilst it’s undeniably tasty, condensed milk can sometimes feel a little heavy. A great way to counter this is by pairing it with fresh fruits like strawberries, blueberries, or mango.
Bake canned apricots into a tart
In our opinion, apricot-based bakes are highly underrated. There’s something about these fruits that provides just the right balance of sweetness and tang, and they fit beautifully into anything from cakes and pies to puddings and crumbles. Since fresh apricots aren’t always available year-round, canned apricots serve as a convenient solution, no matter the season.
One amazing way to make the most of canned apricots is incorporating them into a flaky marzipan tart. First, you’ll need to mix up the marzipan cream — a combination of sugar, almond meal, vanilla extract, egg, lemon juice, and cream. Then, unroll a sheet of puff pastry (shop-bought is fine), spread the marzipan cream onto it, and then layer the drained canned apricot halves on top of that. Bake until the pastry has puffed up and the apricots are gloriously gooey. You can also sprinkle a few flaked almonds on top for added crunch.
Another option is to create a more traditional round tart with shortcrust pastry. Just roll the pastry out, push it into the bottom of a pie pan, and poke a few holes in the base with a fork. Spread a layer of applesauce over the pastry, or sprinkle on some brown sugar, then top with the canned apricot halves. Sprinkle the fruit with more sugar, then bake until golden. Both versions of apricot tart would be wonderful served with fresh cream or warm custard.
Build a trifle with canned strawberries
Canned strawberries are packed with sweetness and make an excellent base for a crowd-pleasing trifle. Their uniquely soft, syrupy consistency makes them particularly well-suited to this layered dessert, where they can infuse the tender sponge layers with tons of fruity flavor.
A traditional British trifle typically comprises layers of ladyfingers or sliced sponge cake, fruit, whipped cream, custard, and sometimes jelly. The best way to serve this dessert is in a large glass bowl, which keeps those lovely layers visible, and you can easily prep everything the day before you intend to serve it. To start, separate the canned strawberries from their syrup. Dip one side of the ladyfingers — or cake slices — into the syrup, and pop these into the bottom of your serving bowl before adding some of the strawberries. Dollop custard on top, spreading it out to the sides, then follow with a layer of thick whipped cream. After repeating each of the layers, you can finish off with a decorative top layer of any remaining strawberries, and that’s all there it to it!
Feel free to enhance your trifle further with a touch of booze. Sherry, brandy, or Madeira wine all make great additions here. Just brush some onto the ladyfingers or slices of cake after arranging them in the bowl, or toss your alcohol of choice with the strawberries before spooning them over.
Whip up a no-bake cheesecake with canned pumpkin
Fans of fall-inspired desserts will know that canned pumpkin is essential if you’re baking a classic pumpkin pie, crafting a homemade pumpkin spice latte, or preparing a batch of fluffy pumpkin muffins. But have you ever tried incorporating this versatile pantry ingredient into a creamy no-bake cheesecake?
First, make a simple crust. Crush up some graham crackers or gingersnap cookies, mix them with melted butter and sugar, press the mixture firmly into the base of a springform pan, and then pop it in the fridge to chill. Next, prepare the filling by beating cream cheese with ingredients like powdered sugar, vanilla, canned pumpkin, and pumpkin pie spice. Then, pour in heavy cream and continue whipping until the mixture is thick enough to hold its shape. Spoon the creamy topping over the chilled crust, smoothing it out evenly, and chill your dessert for at least four hours or preferably overnight. To serve, gently run a knife around the edge of the pan, unclip the sides, and use a cake lifter or two spatulas to transfer the cheesecake to a plate. Top your pumpkin-infused creation with swirls of whipped cream to decorate, if desired.
Make sure you’re using canned pumpkin puree here, rather than pumpkin pie filling. Whilst the two look similar, the latter often contains additional sweeteners and spices. Canned pumpkin, on the other hand, is nothing but pureed pumpkin, so the two are not interchangeable in recipes.
Mix canned fruit cocktail into ice cream
There are endless ways to use a can of fruit cocktail, and this colorful medley of fruit already looks rather dessert-like as it is. But one particularly creative way to enjoy it is folded into a batch of vanilla ice cream. The sweet and tender pieces of peaches, pears, grapes, pineapple, and cherries add moreish bursts of flavor and color to the creamy base, turning a simple frozen treat into something truly special.
Step one is mixing up a basic no-churn ice cream. For this, you’ll need just three ingredients, including another handy canned wonder — condensed milk. Add this to a mixing bowl, along with heavy cream and vanilla extract. Then, mix everything together until thickened. Drain your canned fruit cocktail thoroughly, then fold the fruit pieces through the ice cream mixture. Once you’ve transferred everything to a loaf pan, it’s ready for the freezer. Don’t hesitate to scatter over some extra fruit, or even other toppings like crushed cookies, chopped nuts, or chocolate chips, too. Finally, cover the pan with plastic wrap and freeze overnight before digging your scoop into that fruit-studded goodness.
Make a three-ingredient bread and butter pudding with canned custard
Canned custard is more commonly poured over warm, baked desserts upon serving, rather than being a key element of the recipe itself. However, this creamy canned ingredient shines as part of an easy bread and butter pudding. What’s more, you’ll only need a couple other things to make it. Start with a layer of soft slices of bread, such as white bread or brioche, arranged in the bottom of an oven dish. Add some dried fruits, such as raisins, cranberries, or chopped apricots, and then top with more bread. Continue this alternate layering until you’ve filled the dish. Now for the custard. Simply spoon the contents of the can into a large bowl, and top this up with a splash of water for a runnier consistency. Pour this evenly over the bread and fruit until everything is completely saturated, then bake until perfectly browned on the top.
This paired-back version of the classic dessert is far less time consuming than most traditional recipes, which involve making the custard from scratch, so it’s a great hack for busy weeknights. Serve it up with a dusting of powdered sugar — or even a dash of cinnamon for a warming spice touch — or a drizzle of cream to continue the sweet, indulgent vibes.
Make pancakes with canned rice pudding
Thick, creamy, and flavorful, rice pudding is another canned treat that can absolutely be classed as a standalone dessert. Warm it up, perhaps add a sprinkle of nutmeg and cinnamon, and you’ve got a warming, satisfying bowlful. The possibilities certainly don’t end there, though. In fact, rice pudding can even be used to make a batch of fluffy pancakes.
It sounds a little odd at first glance, but trust us, this combination works. To make a rice pudding pancake batter, combine the contents of the can with an egg, some flour, baking powder, vanilla extract, and cinnamon. Mix well, then get frying. Add a glug of neutral oil or some butter to a pan over low heat. Once it’s warmed up, dollop in spoonfuls of the batter to form the pancakes. They should take about four minutes to cook, with a flip halfway through. The resulting pancakes are mouthwateringly soft and tender, with the subtle creaminess of the rice pudding shining through. Stack them high and serve them with your favorite toppings, such as maple syrup, fresh berries, or chocolate sauce.
Bake canned apple pie filling into cookies
Apple pie filling isn’t just for, well, filling pies. It can also be the star ingredient in soft, spiced cookies that taste like a bite-sized version of apple pie. You can use a classic snickerdoodle cookie base here, with that sweet cinnamon-sugar coating complementing the spiced apple exceptionally well.
First up, prep your cookie dough. You’ll need butter and sugar, which get creamed together until smooth and fluffy. Then, beat in eggs and vanilla extract, followed by flour, cream of tartar, baking soda, and salt. You should now have a thick dough. Scoop out small portions, placing them onto a lined baking sheet, and use your fingers to make a small indent in the middle of each. Scoop a couple of teaspoons of apple pie filling onto each indent. At this point, you can opt to leave the cookies as is for a thumbprint-cookie effect, or use the surrounding dough to create a ball. Either way you go, be sure to dust the cookies with — or roll them in — some cinnamon sugar, bake, and let them cool slightly before devouring.
Whip canned mango pulp it into a creamy mousse
When it comes to mousse flavors, you’re probably familiar with chocolate, lemon, and strawberry. But how about mango? This tropical treat is incredibly easy to make, featuring just three ingredients, including canned mango pulp. Naturally sweet and packed with vibrant flavor, mango pulp is essentially pureed mango flesh, often with the addition of sugar or syrup, and it blends seamlessly into a light, airy dessert that requires no baking.
To create that signature mousse texture, whip up some heavy creamy until it reaches the stiff peaks stage. Then, in another bowl, beat the mango pulp with cream cheese. Gradually fold in the whipped cream until fully incorporated, and that’s your mango mousse complete. This dessert is fantastic served alongside fresh fruits, like tangy raspberries, pineapple, or of course, more mango. A sprinkle of toasted coconut or a few mint leaves serve as an excellent garnish here, too.


