
Roasting chicken is a skill that every cook should master. Nothing beats a chicken with golden, crisp skin covering juicy, flavorful meat, and roasting is the technique you need to learn to get these delicious results. I found over my years of working as a personal chef that roasting chicken was an easy way to prepare a delicious protein without a lot of fuss. Not only can it be enjoyed as is, but it can be turned into other dishes, like chicken tacos, paella, or chicken salad.
As such, mastering this one technique can help you make quick work of a bird and get hearty, tasty meals on the table. While it may sound simple, roasting can be tricky and getting it right requires more than just popping a chicken into the oven. One simple misstep, and you’ll end up with meat that’s dry and stringy, soft skin, or an unevenly cooked chicken. Here are some of the all-too-common kitchen mistakes you need to avoid when roasting chicken.
Roasting a wet chicken
Managing liquid and moisture is a critical step in any recipe. During braising and poaching, for example, it surrounds the food and keeps it tender. Boeuf bourguignon wouldn’t be possible without red wine, while steam from the cooking liquid is essential for steamed asparagus and steamed eggs. Though it can help produce mouthwatering dishes, moisture is not always a good thing, especially when it comes to roasting chicken. A good roast chicken recipe will note that the surface of the chicken needs to be dry before you roast it. Any moisture on the skin will slow the Maillard reaction, which is what gives the chicken its beautiful, brown color.
If your chicken is wet, you’ll end up with a soft, waterlogged bird. Only a dry chicken will end up browned and crisp. Pat the chicken dry before you roast it to remove excess moisture. Don’t forget to dry the inside of the chicken as well. You should also resist the urge to rinse the meat before you prepare it, as this can splatter any bacteria on the chicken around your kitchen.
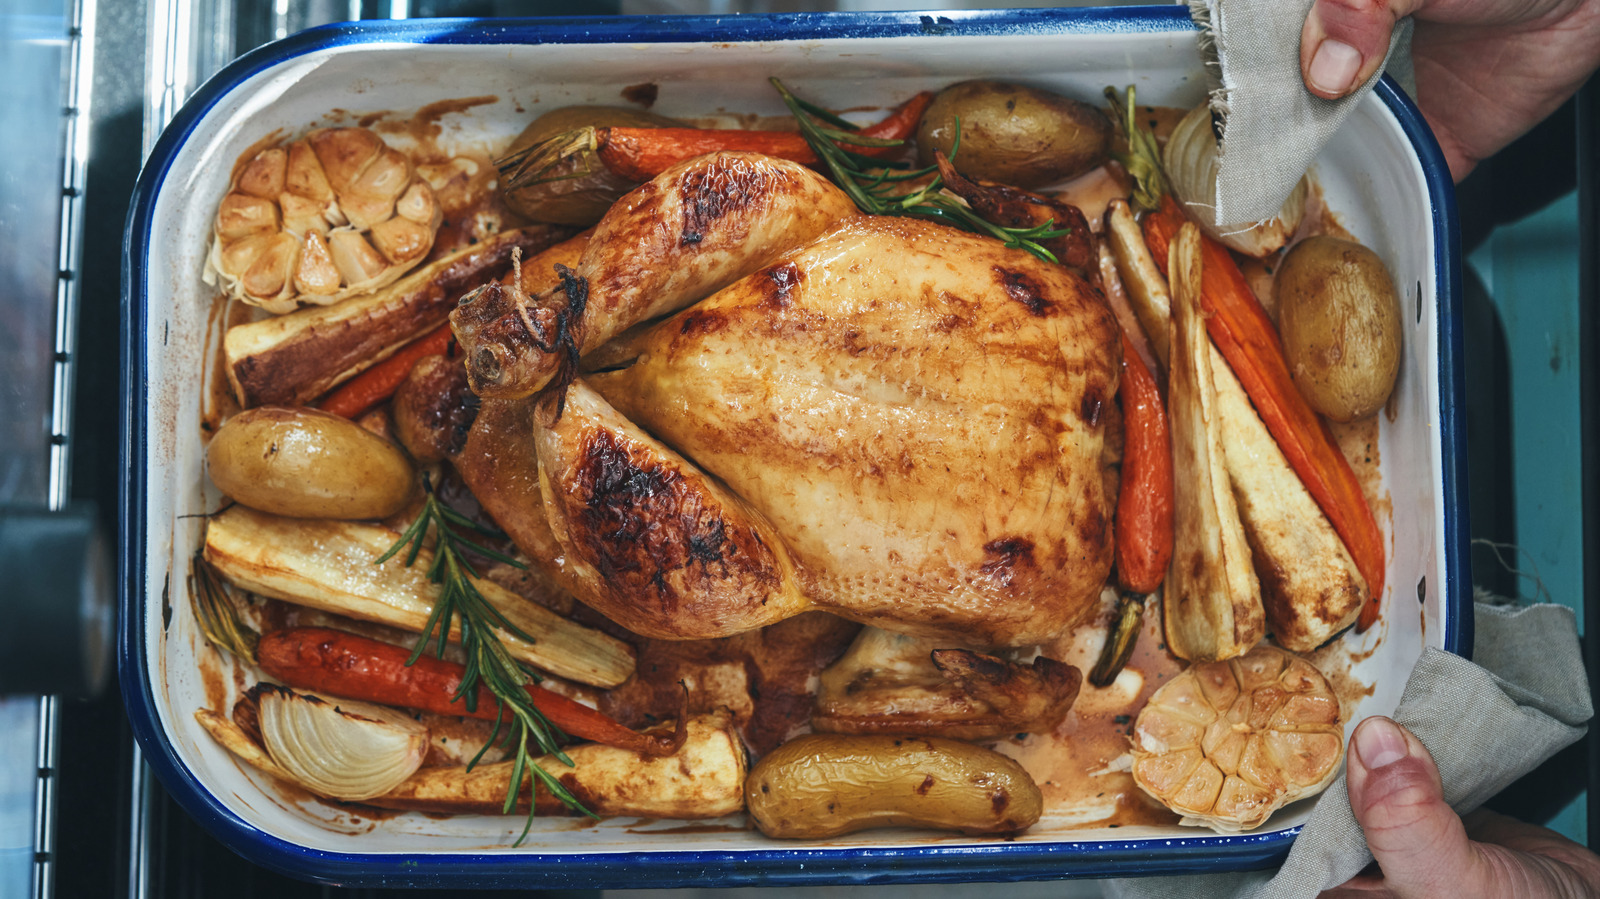
Getting the cooking time and temperature wrong
There are many ways to ruin a dish. Overcrowding your pan can lead to food that’s steamed instead of seared, while underseasoning food results in blandness. Even if you prep your food perfectly, you can easily ruin it by getting the cooking time and/or temperature wrong. This is especially true when roasting chicken. To avoid this, pay close attention to the time and temperature guidance your recipe offers and stick with it.
There are two basic paths you can take when roasting chicken. You can shoot for a lower cooking temperature and a longer cooking time, or go with a higher oven temperature and a shorter cooking time. High-heat and low-heat roasts will offer delicious but different results. Chicken roasted at a lower temperature — 300 F for about three hours — will yield extremely tender meat with soft skin. If it’s crispy skin you’re after, amp up your oven temperature to 425 F for 50 to 60 minutes.
Skipping the spatchcock
One of the trickiest parts of cooking chicken in general is making sure it’s evenly cooked. The various parts of the chicken are different in size and thickness, thus require vastly different cooking times. After all, you don’t want to bite into over- or undercooked chicken. Fortunately, there’s a relatively simple technique you can use to ensure your chicken is perfectly cooked, no matter the part of the bird you’re eating. Mastering the art of spatchcocking will help you roast chicken that’s tender and juicy.
Spatchcocking, also known as butterflying, involves removing the chicken’s backbone. Once the backbone is removed, you can flatten the chicken out so it will cook faster and more evenly. This may sound like a complicated process, but all you need is a sharp pair of kitchen shears to get the job done. Another benefit of spatchcocking poultry is that you’ll have more oven space. A spatchcocked bird is flatter than a whole one, so you can potentially move your oven racks around to accommodate other dishes.
Roasting it straight from the fridge
Roasting is a simple cooking technique; prep your food, place it in a piping-hot oven until it’s cooked through, and you’re done. What you may not know is that a key factor in how well your chicken turns out has nothing to do with the standard steps for roasting — it actually occurs even before you put your bird in the oven. To give your roasted chicken the best odds for success, bring it to room temperature before putting it in the oven. While it may seem like a minor detail to consider, you shouldn’t cook chicken straight from the fridge. Doing so may cause rips in the chicken’s skin, and the worst combo ever — a chicken that’s too brown or burnt on the surface and raw in the center.
If you place a cold bird into a hot oven, it will take longer for the bird to reach the proper temperature, which translates to a longer roasting time. You’ll also run the risk of having a chicken that is unevenly cooked, as different parts of the bird will heat up at different speeds. Smaller parts of the chicken, like the wings, will cook much faster than larger parts, like the breasts or thighs. The result is likely to be dry, overcooked wings, while the rest remains undercooked. Give your chicken 30 to 45 minutes to come to room temperature before you roast it.
Underseasoning it
Nothing beats the flavor of a well-roasted chicken. Part of the beauty of chicken, no matter how you cook it, is its versatility. You can create a completely different flavor simply by switching up your marinades, spices, and seasonings. Roasted lemon chicken can be followed by roasted orange and nutmeg chicken. Whatever flavor profile you’re into, you can tailor a roast chicken to suit it.
One thing you don’t want to do when roasting chicken is skimp on the seasonings. To start, sprinkle your chicken liberally with salt. It will enhance the flavor of the chicken and help create the crispy, golden-brown skin everyone loves. Be sure to season the entire bird —front and back, and inside the cavity as well. A simple mix of salt and pepper is always a good idea, but you can level up your roast chicken by using your favorite spice blends too. Whatever combo of herbs, spices, and seasonings you use, plan on about a tablespoon of seasoning for each pound of chicken.
Not trussing the chicken
The process of trussing a chicken used to intimidate me. When I’d watched chefs on TV do it, it looked like it required the knot-tying skills of an Eagle Scout. Thankfully, that’s not the case. It’s possible to keep things simple when trussing chicken, and it’s a step you don’t want to omit. Trussing is the art of using kitchen twine to secure the legs and wings of a turkey or chicken before roasting it — but it’s not just reserved for poultry. It’s also a useful technique when cooking beef or pork roasts. Trussing them helps the meat keep its shape as it cooks and, as with poultry, helps ensure even cooking.
For larger birds, like turkey, trussing properly is more complicated, as you need to secure the entire tail end of the bird to keep it together. With chickens, it’s enough to simply tie the legs together to keep them close to the rest of the chicken. If they’re left splayed wide, they’re likely to brown and burn before the rest of the bird is cooked. Stick to kitchen twine for trussing. It’s sturdy enough to hold the chicken together, and it won’t burn when the chicken is cooked.
Not letting it rest
In culinary school, we learned a simple technique for cooking some proteins: sear it, roast it, rest it. These steps can be applied to everything from steaks to roasts. When you’re roasting chicken, you’ll skip the searing step — the skin will get deliciously crispy as it roasts — and skip right to resting. Foregoing the resting period after roasting may seem insignificant, but you’ll regret it if you do. It should be considered the final step in the roasting process. The goal with roasted chicken is crispy, flavorful skin, and moist, tender meat. Not giving the chicken time to rest once it’s done can make this difficult to achieve.
Resting is the process of allowing meat and poultry to sit, untouched, after it’s removed from the heat. While the chicken cooks, the juices it contains bubble up to the surface. If you slice it immediately after removing it from the oven, all of those juices will end up on your cutting board. Allowing the chicken to rest once it’s cooked gives the juices time to soak back into the bird. Rest your chicken for at least 15 minutes before slicing it for best results.
Wasting the schmaltz
Sometimes, when you cook, there’s a bonus — an extra byproduct created when a recipe or cooking technique produces or leaves behind something unintentional but delicious. When you’re roasting a chicken, that bonus is schmaltz. Schmaltz is the liquid fat that renders from the chicken as it cooks. It’s one of the reasons you should think twice before throwing away poultry scraps. You can cook those bits of skin and fat over low heat until the schmaltz forms. It’s a beloved ingredient in many dishes and is often just as revered as bacon grease, adding richness and flavor to a variety of dishes.
If you’ve ever marveled at the remarkable flavor vegetables have after they’ve been cooked underneath a roasting chicken, the answer is schmaltz. Want to elevate your croutons? Give them a quick toss in schmaltz before toasting them. Schmaltz is what gives Jewish dishes like latkes and matzo balls their rich, delicious flavor without the use of dairy products.


