
There are few foods as deliciously versatile as the humble taco. The handheld Mexican delicacy can be scoffed down at any time of day, be it breakfast, lunch, or dinner. Tacos also come in plenty of different styles, so they’re impossible not to like — you can always find some to suit your preferences. However, some tacos are more complex to make than others. Birria tacos and their cheesy siblings, the delightfully gooey quesabirria tacos, fall into this camp, but they’re worth the effort.
Birria is a regional variation of barbacoa – a traditional Mexican cooking style based around slow-cooking meat in an earth oven. Native to Jalisco, modern birria is typically made in a slow cooker or a pot. The dish continues to evolve to suit contemporary tastes but it involves marinating meat in an adobo before slow-cooking it in a consomé. Don’t worry if those terms are unfamiliar, as we’ll get into them shortly. Birria can be enjoyed as a stew, but it’s common to shred the meat, load it into tortillas, and serve it with the consomé for dipping. Folks have come up with interesting ways to use birria, from serving it with ramen to stuffing it into a grilled cheese. I’ve been in the hospitality business for nearly two decades, and have managed to get hands-on with birria numerous times to learn from the pros. Today, I’m sharing my best tips for getting the most out of the exquisite dish.
Choose the right meat
One of the best things about birria tacos is that you’ve got a few different options when it comes to the type of meat you choose. Modern birria is typically made with beef — it has a rich, familiar taste that blends perfectly with the traditional flavors of the spicy, umami-forward adobo and consomé. Beef also softens wonderfully when you slow cook it, and it shreds nicely, making it ideal for use in tacos.
If you want to make truly authentic birria, goat meat is the way to go. The deliciously gamey, slightly earthy flavor pairs incredibly well with the adobo marinade. The downside of using goat is that it can be tricky to source, and some people find the idea of eating goat meat unappealing, despite how great it tastes. Fortunately, you can compromise and use lamb instead. Lamb is generally much easier to find, and it shares many of the same flavor characteristics as goat. While you can use pork, it tends to be a little too greasy and can become too soft during slow cooking. It’s also possible to make birria with chicken, but you’ll need to dramatically reduce the cooking time. This can make it a good choice if you don’t have the time to make a more traditional birria stew, but you will miss out on some of those deeper flavors.
Combine cuts to boost flavor and texture
Whatever type of meat you settle on, make sure you’re choosing the best cut for the job. Because birria involves slow cooking, you want to opt for fattier cuts with a reasonable amount of connective tissue that will break down for a melt-in-your-mouth texture. However, you’ll get even better results with a combination of cuts. This approach lets you include leaner cuts that will prevent your birria from becoming too greasy. I also strongly recommend including bone-in cuts because bone contains marrow and collagen. These will melt into the birria while it’s cooking and add a deep umami flavor to the dish while greatly enhancing its silky texture.
The ideal cut of beef for birria is arguably a well-marbled chuck roast. You can combine this with short ribs or beef shank to get the benefits of the bone I just mentioned. The best cut for braising pork is going to be the butt or shoulder, and I tend to go with the latter. You can also combine it with spare ribs for the bone benefits, but be aware that they can be pretty fatty. If you’re making your birria with goat or lamb, I recommend using the shoulder cut again. Like with pork, combining the shoulder with ribs will give you that bone-in quality to improve the taste and texture and balance the fat content.
Sear your meat first
Whenever you’re making birria, I strongly suggest searing your meat before you start slow-cooking it. You’ll often hear that searing meat helps lock in the juices for extra flavor, especially in relation to steak. This is actually a common misconception, but there are still plenty of benefits to searing the meat first.
First, searing lets you take advantage of the Maillard Reaction. This is the name for the chemical reaction that occurs when you heat food, browning its sugars and proteins. The Maillard Reaction will help release complex, roasty umami flavors with hints of caramelization and create a tasty crust on the meat. This crust will then get absorbed into the consomé when the pot is deglazed with adobo and broth, boosting the entire mouthfeel and flavor profile. Second, although searing doesn’t lock in juices, it does help the meat retain its texture during slow-cooking and prevents it from becoming too soft or mushy. This is particularly important when you’re shredding the braised meat for tacos. Lastly, browning your birria meat will also give it a delightfully appealing reddish hue. Color plays a surprisingly important role in Mexican cuisine, so it’s always worth taking steps to make your birria visually pop.
Brush up on your Mexican chilis
In the next section, we’ll get specific about creating the perfect adobo marinade for birria. First, I want to talk about chili peppers. If the meat is the heart of a good birria, chilis are the soul. Real birria calls for authentic Mexican chilis, so you’ll want to be sure you either have access to a Mexican grocery store or be prepared to shop for the ingredients online.
Birria typically calls for a blend of different chilis, so it’s crucial to know the properties of each type and how they’ll affect your recipe. The most common blend calls for three types of chilis, and while some chefs will add extra varieties, we’ll start by looking at the core trio. First up, we have guajillo chilis. These aren’t too spicy and have a slightly fruity and smoky profile that makes them extremely versatile. They’re usually the dominant chili in birria. Next, we have ancho chilis. A notably mild chili, anchos have a sweet fruitiness and a rich, earthy character that adds much-needed depth to the adobo. Last, we have chile de árbol. These are what we use to bring the heat, with a sharp and spicy character that’s handy for giving any recipe a nice kick. These three varieties will form an excellent spice base for birria, but feel free to add other varieties — like morita or pasilla chilis — to tweak the flavor profile.
The magic starts with the marinade
The base of birria is called adobo, a traditional Spanish marinade used to preserve and enhance the flavor. While many countries use a form of adobo in their cuisines, it differs significantly from place to place. Spanish-influenced adobo is distinct from the famous adobo of the Philippines, and the Mexican-style adobo used in birria differs from the marinade employed by other Latin American cuisines.
Most adobo recipes begin with softening chilis and tomatoes in boiling water. These are then blended together with an array of spices and seasonings. Common ingredients include garlic, onion, smoked paprika, oregano, cumin, thyme, cloves, cinnamon, salt, and pepper. An important marinade component is acid because it helps break down connective tissues, tenderizing the meat and making it more flavorful. Adobo is no different. Vinegar is a great choice for adding acidity to your marinade, and a simple white vinegar will do the trick. For an extra fruity profile, you can use apple cider vinegar, fresh lime juice, or a combination of both. To imbue your birria meat with even more flavor, you can soak it in the adobo for a few hours or overnight. If you decide to take this approach, it’s generally better to sear the meat after it’s sat in the marinade. Remove the meat pieces from the adobo, brown them, then pop them back in when you’re ready to start cooking.
Don’t be afraid to char your ingredients
You’ll often find that most birria recipes don’t require cooking any adobo ingredients beforehand besides boiling the chilis and tomatoes to soften them. There’s nothing wrong with this approach and it certainly won’t stop your birra tacos from tasting delicious. That said, if you’re like me and adore a smokier taste profile, it’s worth toasting the components before blending them.
Like searing meat, charring your adobo ingredients takes advantage of the Maillard Reaction to unleash sweet and umami flavors that add wonderful depth to the marinade. However, the level of char you aim for will vary depending on how smoky you want your birria to taste, and it varies depending on the ingredient. The best tool for the job is a dry cast-iron skillet, although a baking tray under the broiler will also do the trick. For the tomatoes and chilis, you want to toast them before you soften them in boiling water. Tomatoes can be charred until blistered and blackened, but be wary not to overcook the chilis as they can start to taste bitter if overdone. You can also char your other ingredients, like the onion and garlic. For whole spices and herbs, lightly toast them in a pan until their oils come to the surface and they become aromatic, but be extra careful not to burn them. Once everything’s been toasted to perfection, blend them together as usual.
Slow and low is the way to go
One thing to remember if you’ve never made birria tacos before is that the cooking process takes time and shouldn’t be rushed if you want maximum flavor. Cooking the birria on low heat over a long period of time is what allows the connective tissues in the meat to break down, making the meat beautifully tender. Slow cooking allows way more time for the consomé to infuse the meat and let the flavors develop. A low heat is crucial because it stops the meat from drying out and becoming too tough.
Realistically, birria should take at least 5 hours to cook for a deliciously authentic result. Personally, I try to aim for twice as long if I can. While that may sound excessive, I promise it makes all the difference. In theory, you can take a shortcut and use a pressure cooker, which can cut the cooking time down to as little as an hour, perhaps an hour and a half if you’re working with particularly tough cuts of meat. The drawback of this approach is that you’re still cutting down on the amount of time available for the meat to tenderize and the flavors to concentrate. You can still make perfectly serviceable tacos this way, but the birria lacks the silky texture and richer character of the slow-cooked version.
Don’t be afraid to add more ingredients as you go
There’s nothing wrong with prepping your meat and adobo, adding your broth to the pot, and staying hands-off until the cooking time is up. However, some slow-cooked dishes can benefit from extra ingredients added during cooking, and birria is one of them. Adding ingredients later can reduce their intensity and give a fresher aspect to the stew.
Some chilis can taste bitter when cooked for too long, so you always use fewer chilis in your initial adobo recipe and then add more an hour or two before the birria has finished cooking. Adding more aromatics and herbs halfway through the cooking time can also give the dish brighter, lighter flavors. This is also an effective way to add crunchier, contrasting textures to your birria, as the ingredients will have less time to soften. If you’ve not used bone-in cuts of meat, add bone marrow discs halfway through cooking to avoid missing out on the benefits of an improved texture and umami boost. Lastly, it’s always worth tasting your birria while it cooks to check if it’s well-balanced. If it’s tasting too rich or fatty, you may want to add an extra splash of acid. If the liquid is getting low or your birria is too salty, it may need a broth top-up to even things out.
Reduce your stew to concentrate the flavors
Reduction is a core cooking process that can unlock stunning flavors and create a thick, silky consistency. When you slowly cook an uncovered liquid, the water evaporates. Everything else, like the meat juices, fats, aromatics, and spices, stays behind, meaning the flavors become more highly concentrated.
Reducing also thickens the texture of liquids, giving broths a fuller and velvety mouthfeel. The aromas also intensify, becoming richer and more complex, and colors typically deepen. Too much reduction can be a problem — if you take out too much water, the liquid can become syrupy and far too salty, so balance is critical. You want to leave the lid on your birria while it slow-cooks during the majority of the cooking time, as the steam stays trapped and is reabsorbed into the stew. However, I recommend uncovering the pot for the last 30 minutes or so. This should be enough time to gently concentrate the birria’s flavors and improve the texture without letting too much water escape. Any longer, and you also risk the meat drying out. Once the lid is off, intermittently taste the broth and replace the cover if necessary.
Let the meat rest before shredding it
One of the most common mistakes I’ve seen in amateur and professional kitchens is neglecting to let meat rest once it’s done cooking. Resting is critical for maintaining the meat’s texture and flavor.
When you let meat rest, two important things happen. First, you’re allowing time for the juices within to redistribute evenly throughout the meat. If you cut or shred the meat straight away, the juices leak out too quickly, making it dry. Second, the muscle fibers in the meat contract and firm up as they cool down, which also helps them retain moisture. In the case of birria, taking the meat out and letting it rest helps to keep its texture. This is especially important when you want to shred the meat for birria tacos because it makes it easier to pull apart while also helping it retain its texture without becoming soggy or mushy. Also, when shredding birria meat, I find it easiest to use my hands. By allowing the meat cool, you’re much less likely to burn your hands and fingers as you pull it apart.
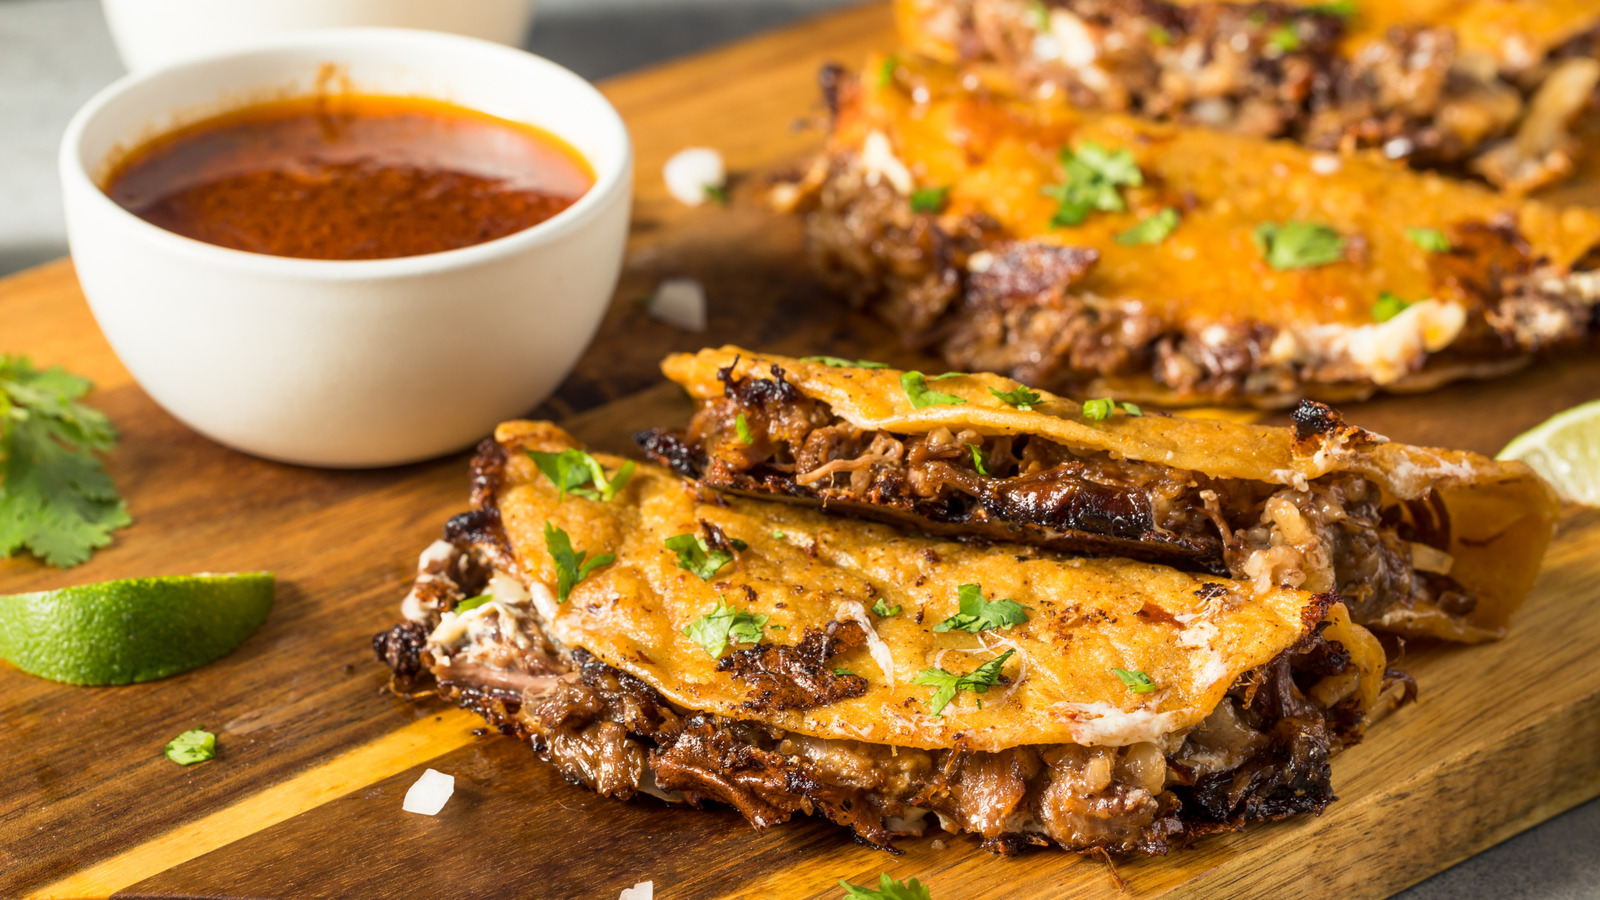
Save the grease to supercharge your tortillas
While taco fillings may be the star of the show, it’s a huge mistake to overlook the importance of the tortilla. Tortillas come in many different varieties, and while you can choose whichever style you fancy, I like to stick to the classic yellow corn for birria tacos.
Making your own tortillas from scratch takes patience, but the results are worth it. It’s not like you don’t have the time while your birria is slow-cooking. That said, there’s nothing wrong with turning to quality store-bought tortillas for your tacos. This particular trick works with whichever option you choose. While your birria meat is resting, take the opportunity to skim the excess grease from the top of the consomé with a spoon or ladle. The primary benefit is to make the consomé less greasy and better for dipping the tacos in. However, don’t throw that grease away. Instead, use it to shallow fry your tortillas because it’s absolutely packed with birria flavor. It’ll help crisp up the tortillas, giving them a wonderful crunch, and maximizing their taste potential. The grease will also create that classic red-orange crust on classic birria tacos. If there’s any grease left over, you can save it for future recipes too – this stuff is liquid gold. Chill it and blend it with butter for a deliciously savory spread to roast vegetables or fry your eggs the next morning.


